Posts Tagged eclipse
How to deploy REST based web services to Liberty Profile ?
Posted by Sébastien Stormacq in IBM, Java on 08/10/2012
In my last blog entry I described how to install Liberty Profile and to configure an Eclipse based development environment. In this entry, I will show you how to develop & deploy a “Hello World” complexity REST based web service.
Official JAX-RS / Liberty profile is available on IBM Documentation web site. When developing or debugging REST based services, it is always good to know that IBM’s WebSphere Liberty profile is using Apache’s Wink implementation behind the scene.
Unlike some other Java based application servers (this one and this one for example), WebSphere Liberty Profile does not perform many under covers magical for you, in particular it does not register an application context, you will need to write (one line of) code to do that.
That being said, the process is quite similar for every application server and IDE :
1. Create a web based project
Choose a Project Name, select the runtime for deployment and uncheck the “Create EAR” option
2. add a POJO class that will serve as “resource”
Select a package name and class name.
Type the following code :
import javax.ws.rs.core.Context;
import javax.ws.rs.core.UriInfo;
import javax.ws.rs.PathParam;
import javax.ws.rs.Consumes;
import javax.ws.rs.PUT;
import javax.ws.rs.Path;
import javax.ws.rs.GET;
import javax.ws.rs.Produces;

@javax.ws.rs.ApplicationPath("resources")
@Path("/test")
public class Demo extends javax.ws.rs.core.Application {

    @Context
    private UriInfo context;

    @GET
    @Produces("application/xml")
    public String getXml() {
        return "<xml>Hello Rest World !</xml>";
    }

    @PUT
    @Consumes("application/xml")
    public void putXml(String content) {
    }
}
3. add your business code for the PUT and GET methods
4. Before deploying – Add JAX-RS “feature” to your server configuration
This will tell the Liberty kernel to load the JAX-RS server side implementation. You do not need to restart your server when adding / removing features.
5. Deploy and Test
At this stage, Eclipse’s browser will open on the application default URL and will display an error message. This is normal as we did not define a landing page or default servlet in this project (index.jsp or index.html) for example.
To access the REST web service, use this URL pattern :
http://<hostname>:<port number>/<project name>/<application path>/<path>
which translates for this example to
http://localhost:9080/TestREST/resources/test
Et voilà, you just created, deployed and tested your first REST based web service on WebSphere Liberty Profile.
Enjoy !
How to install WebSphere 8.5 Liberty profile on Mac
Posted by Sébastien Stormacq in IBM, Java, Mac OS X on 09/09/2012
WebSphere 8.5 Liberty Profile is a small, fast, agile WebSphere runtime that you – developers – can use to develop, test or embed in your applications. The runtime is provided free of charge from IBM. Like every Java EE Profile, it implements a subset of the Java EE Specification, while ensuring 100% “upwards” fidelity to the full WebSphere Application Server.
On my i7 – quad core – machine, WAS Liberty starts in less than 1 sec. With not application deployed.
Installing the runtime is as easy as unzipping a file on your drive, here are the steps
- download from wasdev.net (46 Mb only)
- unzip
java -jar wlp-developers-8.5.0.0.jar
After displaying and approving the distribution license, you will be ready for the next step
- Optional : create a server instance (an instance “defaultServer” is created for you automatically, this step is optional)
# cd wlp
# chmod u+x bin/server
# ./bin/server create MyInstance
Server MyInstance created.
- start it
# ./bin/server start MyInstance
Or just this line to start the default instance
#./bin/server start
Server MyInstance started with process ID 59946.
Now that you have the runtime, you are ready to install the tooling to manipulate it from Eclipse.
- Start Eclipse (Indigo or Juno)
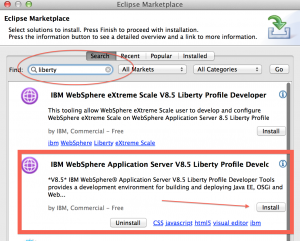
- Open Eclipse MarketPlace
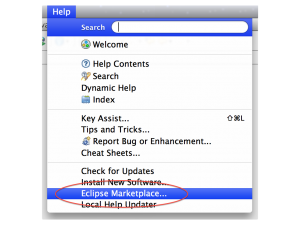
- Search for “liberty” and click on “Install”
- In the “Eclipse” menu, click on “Preferences”
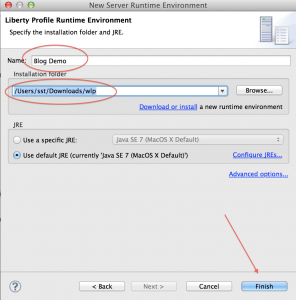
- In the “Preferences” pane, select “Server”, then “Runtime Environment” and click on “Add”
- Select “WebSphere Application 8.5 Liberty Profile”
- Give the name you want, point to your Installation directory (see bullet 2 in the installation instructions above) and click “Finish”
- Switch to the “Server” window in the “Java EE” perspective
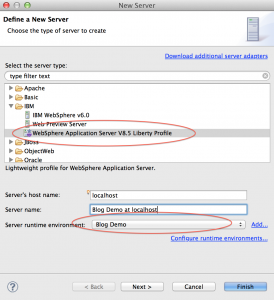
- Right-click – New -> Server, choose your newly created runtime instance
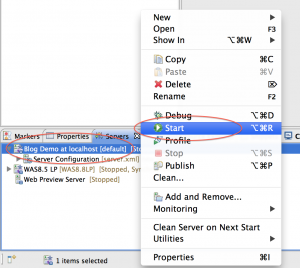
- Don’t leave the “Server” window, right click on the server name and choose “Start”
The “Console” window should automatically open, and within a few seconds, you should see the following line to appear :
Launching default (wlp-1.0.0.20120428-1251/websphere-kernel_1.0.0) on Java HotSpot(TM) 64-Bit Server VM, version 1.7.0_07-b10 (en_US)
[AUDIT   ] CWWKE0001I: The server default has been launched.
[AUDIT   ] CWWKZ0058I: Monitoring dropins for applications.
[AUDIT   ] CWWKF0011I: The server default is ready to run a smarter planet.
You have now a fully functional WebSphere Liberty profile installed and the corresponding tooling in Eclipse. The tooling allows you to stop/start the application server, but also to manage its configuration and, obviously, to deploy applications on it.
In the next blog entry, I will show you how to deploy a REST based web service on Liberty
Enjoy !
GlassFish Tools for Eclipse are available
Posted by Sébastien Stormacq in Java on 24/03/2009
Sun is making available GlassFish Tools for Eclipse (v0.9, final version to be release soon). This is a pre-configured package containing Eclipse 3.4.1 alongside with GlassFish v2.1 and GlassFish v3 prelude and the required Eclipse plugins to effectively manage and deploy applications to GlassFish right from the IDE.
Q: Who is the target for this offering?
A: Developers or organizations that have already standardized on or prefer Eclipse over NetBeans.
Q: Why has Sun created this offering?
A: Sun has created a strong preference for GlassFish among NetBeans users. However, a large community of developers have chosen Eclipse as their IDE of choice. Today those developers have to download open source products from multiple locations and configure them to work together (error prone), increasing the barrier to entry. This offering creates a positive feature-rich out-of-the-box experience for Eclipse developers. In additional, developers can now leverage the open source plugins created by competitive frameworks (Spring, SEAM, Hibernate, etc) within a GlassFish-focused IDE. This bundle will also improve the relationship between the community of Eclipse developers and Sun.
Q: Is Sun moving away from Netbeans towards Eclipse?
A: No. Sun is expanding its reach by embracing not just the NetBeans developer community, but also the Eclipse community. This is a consistent with Sun’s strategy of using open source to "lower the barrier to entry" – in this case to a large developer community.


