Archive for category Uncategorized
Use your eID to authenticate at web sites, the open source way
Posted by Sébastien Stormacq in Uncategorized on 11/03/2008
For countries that have adopted an Electronic Identification Card (eID), implementing web application authentication based on the eID card is an attractive solution, because the issuer is trustworthy (that’s the least we can say) and the proof of identity has a legal value.
This blog describes how to configure OpenSSO (or the Sun supported Access Manager) to provide strong authentication based on the eID certificate.
I made my tests with the Belgium eID card but I suspect other cards to behave similarly.
On the client side, you will need, well an eID, a card reader and the required drivers (aka middleware) usually provided by the card manufacturer or the card issuer.
Once this is installed, you will need to add the Card as a Security Device (Certificate Store) into the list of security devices recognized by your browser. In the case of the Belgium eID card, Fedict does provide a tutorial for the main browsers, mail readers and office suites.
On the server side, all the softwares I used are all available as open source project or, alternatively, if you’re looking for indemnification and 24/7 local support, as a commercial offering from Sun.
- Glassfish v2 (or Sun Java System Application Server 9.1)
- OpenSSO v1 build3 (or Sun Java System Access Manager 7.1)
- OpenDS v1 (or Sun Java System Directory Server)
Just install Glassfish, OpenSSO using embedded or external OpenDS (I choose Embedded for simplicity). Instructin to download and install glassfish are posted here. Instructions to download and install OpenSSO are posted here.
There are two main steps to configure the certificate authentication with OpenSSO : prepare the LDAP backend and configure the Authentication Module.
Prepare the LDAP
The first step requires you to create an entry for the user in the LDAP server. Amongst the usual firstname, lastname attributes, this entry will contain the user certificate (it’s public key, signed by the Government’s key, aka Certificate Authority) and the card serial number, that we will use to uniquely match the card’s certificate with a user’s LDAP entry.
1. Extract your certificate and the root certificates from your card
On Linux and Solaris, use can use the pkcs15-tool provided by OpenSC.
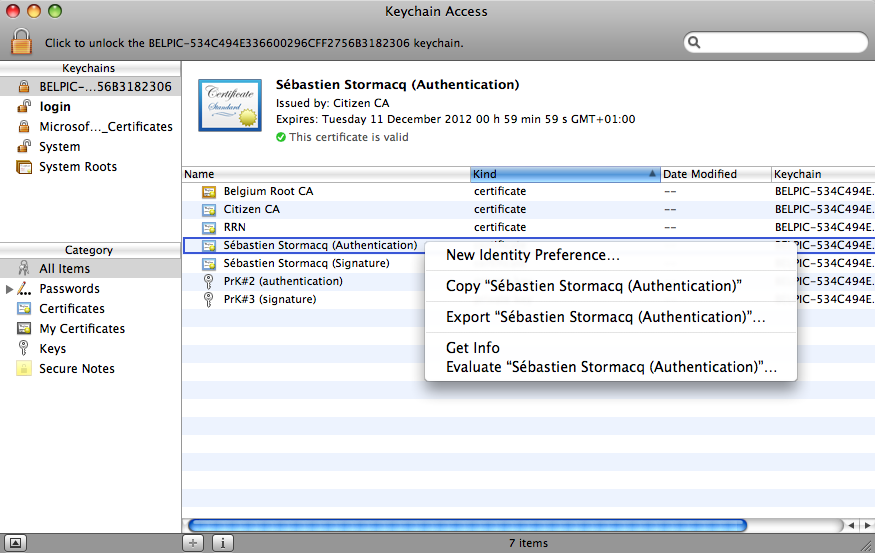
On Mac OSX, you start the KeyChain Access application (located under Applications -> Utilities), right click on the certificate name, then select "Export <Certificate Name>" as shown below.
2. Verify your certificate
You can verify the content of the certificate just extracte with the OpenSSL command (adjust file name) :
openssl x509 -inform DER -in ./Desktop/sst.cer -text
3. Prepare the LDAP entry
You have to create an LDAP entry for the user represented by your eID card. I used the following LDIF file and the ldapadd command to create the LDAP entry. Alternatively, you can use any LDAP GUI such as LDABrowser.
dn: uid=sst,ou=People,dc=sun,dc=com
objectClass: person
objectClass: inetorgperson
objectClass: top
objectClass: organizationalperson
sn: Stormacq
userPassword:: e1NTSEF9cnpjNHFEcm9HbTVJV0IvZHJuQW5iVnNkd0crWW9YS0NrWUsxRVE9PQ==
cn: Sebastien Stormacq
uid: sst
givenName: Sebastien
(my password is password)
[UPDATE]
To Simplify the process of creating new entries, you can also use the following ldapmodify command :
-bash-3.2$ ldapmodify -b -a -D "cn=Directory manager" -w password -p 1389
dn: uid=sst,ou=People,dc=sun,dc=com
objectClass: person
objectClass: inetorgperson
objectClass: top
objectClass: organizationalperson
sn: Stormacq
userPassword: password
cn: Sebastien Stormacq
uid: sst
givenName: Sebastien
serialNumber: 72020412345
userCertificate: /export/home/sst/sst.cer
adding new entry uid=sst,ou=People,dc=opensso,dc=java,dc=net
The -b option of ldapmodify ensures the required magic to read the certificate file and base64 encode it
[/UPDATE]
Test you LDAP entry by issuing the follwoing command (change hostname, port number, password and uid accordingly):
spirou:OpenDS sst$ ldapsearch -h localhost -p 1389 -D "cn=Directory Manager" -w adminadmin -x uid=sst dn
# extended LDIF
#
# LDAPv3
# base <> with scope subtree
# filter: uid=sst
# requesting: dn
#
# sst, People, sun.com
dn: uid=sst,ou=People,dc=sun,dc=com
# search result
search: 2
result: 0 Success
# numResponses: 2
# numEntries: 1
4. Import the Certificate into the LDAP
The default LDAP schema contains an attribute to store the user’s certificate : userCertificate. This is a binary attribute. To add this attribute, you have to convert your certificate in BASE64 format and issue an ldapmodify command.
I was lazy and used the LDAPBrowser’s GUI instead. This GUI allows you to load a binary attribute from a file content : right click on the entry, select Add Attribute, type userCertificate as attribute name, select Binary as type, then load the content of your certificate file.
5. Import the SerialNumber in the LDAP
The eID Serial Number will be used as a unique attribute to match the card’s certificate and the LDAP entry. It will also be used to retrieve’s the user’s profile from the LDAP. We therefore need to add a serialNumber attribute into the LDAP. Unfortunately, such an attribute is not defined in the LDAP schema. We have two options here : the nice and clean way to add the attribute is to modify the LDAP schema to add support for an extra attribute. The quick and dirty way is to disable schema check on OpenDS.
Guess which option I choose 🙂 ?
To disable schema check on OpenDS, open the file <opends home>config/config.ldif and change ds-cfg-check-schema: true to ds-cfg-check-schema: false
And restart OpenDS (if you are using the embedded OpenDS, restart Glassfish). Now, we are ready to add our serialNumber attribute.
First, find your serial number in your certificate
spirou:~ sst$ openssl x509 -inform DER -in ./Desktop/sst.cer -text
Certificate:
Data:
Version: 3 (0x2)
Serial Number:
10:00:00:00:00:00:ef:0c:a4:e2:c3:87:79:34:76:24
Signature Algorithm: sha1WithRSAEncryption
Issuer: C=BE, CN=Citizen CA/serialNumber=200715
Validity
Not Before: Dec 13 00:46:02 2007 GMT
Not After : Dec 10 23:59:59 2012 GMT
Subject: C=BE, CN=S\xC3\xA9bastien Stormacq (Authentication), SN=Stormacq, GN=S\xC3\xA9bastien G\xC3\xA9rard/serialNumber=72020412345
Subject Public Key Info:
Public Key Algorithm: rsaEncryption
RSA Public Key: (1024 bit)
Modulus (1024 bit):
00:84:81:47:4b:68:51:86:21:9a:04:5c:79:16:3a:
e5:d2:44:fc:2e:7c:37:59:8c:89:dd:36:21:7b:da:
44:10:f3:1c:3d:a6:ac:44:da:54:c9:0e:3a:a8:e2:
b4:e4:e3:1d:15:3c:3f:3b:e6:8b:32:61:49:48:32:
10:ee:68:d1:b7:13:f9:95:8b:9f:51:72:84:f0:ed:
b4:cb:cc:e5:3a:85:7e:4d:c0:1d:25:80:9d:df:25:
8d:ca:28:e1:a1:e7:79:d7:fd:b8:b2:87:04:01:dc:
9d:88:17:fe:7f:c0:5a:0c:28:6d:25:08:08:b0:57:
41:b2:e4:52:14:0b:89:e0:2f
Exponent: 65537 (0x10001)
Then, use ldapmodify or LDAPBrowser’s GUI to add an attribute named serialNumber with the appropriate value.
A last ldapsearch will allow us to verify that everything is OK (change hostname, port number, password and uid accordingly) :
spirou:OpenDS sst$ ldapsearch -h localhost -p 1389 -D "cn=Directory Manager" -w adminadmin -x uid=sst
# extended LDIF
#
# LDAPv3
# base <> with scope subtree
# filter: uid=sst
# requesting: ALL
#
# sst, People, sun.com
dn: uid=sst,ou=People,dc=sun,dc=com
objectClass: person
objectClass: inetorgperson
objectClass: top
objectClass: organizationalperson
sn: Stormacq
userCertificate:: MIID9jCCAt6gAwIBAgIQEAAAAAAA7wyk4sOHeTR2JDANBgkqhkiG9w0BAQUF
ADAzMQswCQYDVQQGEwJCRTETMBEGA1UEAxMKQ2l0aXplbiBDQTEPMA0GA1UEBRMGMjAwNzE1MB4XD
TA3MTIxMzAwNDYwMloXDTEyMTIxMDIzNTk1OVowgYIxCzAJBgNVBAYTAkJFMS0wKwYDVQQDDCRTw6
liYXN0aWVuIFN0b3JtYWNxIChBdXRoZW50aWNhdGlvbikxETAPBgNVBAQTCFN0b3JtYWNxMRswGQY
DVQQqDBJTw6liYXN0aWVuIEfDqXJhcmQxFDASBgNVBAUTCzcyMDIwNDQ1MTgyMIGfMA0GCSqGSIb3
DQEBAQUAA4GNADCBiQKBgQCEgUdLaFGGIZoEXHkWOuXSRPwufDdZjIndNiF72kQQ8xw9pqxE2lTJD
jqo4rTk4x0VPD875osyYUlIMhDuaNG3E/mVi59RcoTw7bTLzOU6hX5NwB0lgJ3fJY3KKOGh53nX/b
iyhwQB3J2IF/5/wFoMKG0lCAiwV0Gy5FIUC4ngLwIDAQABo4IBODCCATQwHwYDVR0jBBgwFoAUys4
fltKUqk3aDuoZtMinyvJVRMUwbQYIKwYBBQUHAQEEYTBfMDUGCCsGAQUFBzAChilodHRwOi8vY2Vy
dHMuZWlkLmJlbGdpdW0uYmUv1234Z2l1bXJzLmNydDAmBggrBgEFBQcwAYYaaHR0cDovL29jc3AuZ
WlkLmJlbGdpdW0uYmUwRAYDVR0gBD0wOzA5BgdgOAEBAQICMC4wLAYIKwYBBQUHAgEWIGh0dHA6Ly
9yZXBvc2l0b3J5LmVpZC5iZWxnaXVtLmJlMDkGA1UdHwQyMDAwLqAsoCqGKGh0dHA6Ly9jcmwuZWl
kLmJlbGdpdW0uYmUvZWlkYzIwMDcxNS5jcmwwDgYDVR0PAQH/BAQDAgeAMBEGCWCGSAGG+EIBAQQE
AwIFoDANBgkqhkiG9w0BAQUFAAOCAQEAbsgtXPw03mr/GdB4ph7EkEALrcC1rMYZ+36Z4ZjnpQFVw
Mq6Urio5VfgWvFLyHG2mv15mEoA60DgT0xJpIIJIvmPRnugXla572lFUQXcySe9iiLNu45YWyYBFs
eaI/AlUCfxlg7nO0juDns+OdhzRv3JrOnBptLhcp9WEjvOQLH7vlm7ZV8Ez2xzdeA8Zp9Jo/wtPcq
nSBzNJ/LdA0CMKXKyqqbYdlHSfOh5Bp0uMlZ0KQeZMVYd1qwLqk/cfeyj61QrZbo4+VAwp4qT3FxL
p8IBKtyTEJm17Lsn9NkdVhSkFS8vRVgfsdgfcY3kDTC+HNbkL6jm2zd3b3RoYbyAEwAAAAAAAAAAA
AAAAAAAAAAAAAAAAAAAAAAAAAAAAAAAAAAAAAAAAAAAAAAAAAAAAAAA
userPassword:: e1NTSEF9cnpjNHFEcm9HbTVJV0IvZHJuQW5iVnNkd0crWW9YS0NrWUsxRVE9PQ=
=
cn: Sebastien Stormacq
serialNumber: 72020412345
givenName: Sebastien
uid: sst
mail: sst@maildomain.net
# search result
search: 2
result: 0 Success
# numResponses: 2
# numEntries: 1
We are now ready to configure the OpenSSO Certificate Authentication module.
Configure Certificate Authentication in OpenSSO and Glassfish
1. Import Root Certificate into Glassfish certificate store
Glassfish must be able to verify your certificate’s authenticity. You must import the two Root Certificate (Citizen and Belgium) into Glassfish’s cacerts.jks certificate database (change file path accordingly) :
- keytool -import -alias belgium -file /Users/sst/Desktop/belgium.cer -keystore ./cacerts.jks -storepass changeit
- keytool -import -alias citizen -file /Users/sst/Desktop/citizen.cer -keystore ./cacerts.jks -storepass changeit
The cacert file is located under <glassfish home>/domains/<your domain name>/config
2. Change Glassfish’s configuration to enable client-side certificate authentication
By default, client-side certificate is disabled on Glassfish, we need to re-enable it : edit the domain.xml file located in the Glassfish’s domain configuration directory (same as above), and change.
<http-listener acceptor-threads="1" address="0.0.0.0" blocking-enabled="false" default-virtual-server="server" enabled="true"
family="inet" id="http-listener-2" port="55181" security-enabled="true" server-name="" xpowered-by="true">
<ssl cert-nickname="s1as" client-auth-enabled="true" ssl2-enabled="false" ssl3-enabled="true"
tls-enabled="true" tls-rollback-enabled="true"/>
</http-listener>
And restart Glassfish
3. Create a certificate-based authenticaion module
- Logon on the OpenSSO console (http://your host name:your port number/opensso)
- Select the realm (default name is sun)
- Select Authentication tab
- Under "Module Instances", click new
- Type a name for the module, i.e. eID
- Select Certificate in the list
- Click OK
4. Configure the Authentication Module
Click on the eID module in the list of available modules and configure as show below :
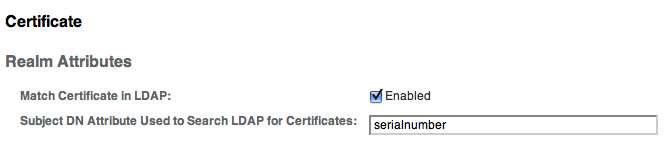
This will tell the Authentication module to use the Certificate’s serialNumber attribute to search for a matching certificate in the LDAP data store.
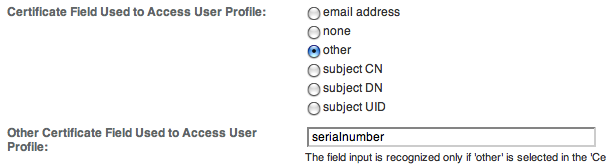
Then specify which attribute will be used to access the user’s profile in LDAP (notice that the authentication operation and the profile retrieval operation might use different LDAP attributes)
Finally,
- in the "DAP Server Where Certificates are Stored" list, be sure that your LDAP server is referenced, i.e. localhost:50389 when using the embedded OpenDS,
- Ensure the user name and credentials to access the LDAP store are correct.
- Ensure the base DN is given in the "LDAP Search Start DN" list (mine is ou=people,dc=sun,dc=com)
Click Save, then Back to Authentication
5. Configure Authentication’s Advanced Properties
Open the "Advanced Properties"
Ensure the "User profile" is Required.
Add the serialNumber attribute in the "Alias Search Attribute Name" as shown below :

This tells OpenSSO to search the LDAP attribute serialNumber for matching serialNumber from the certificate.
6. Configure the Authentication Chain
Finally, we must add our Certificate Authentication module in our authentication chain. We are adding it in the ldapservice chain, in the first position and with the "Sufficient" attribute, as shown below
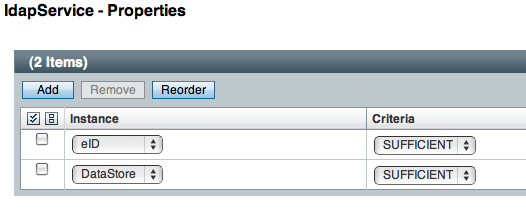
This setting will make the Certificate Authentication module the first one to be proposed by OpenSSO. Should the certificate based authentication fails, OpenSSO will fall back to the traditional LDAP authentication, allowing your user to continue to connect to OpenSSO.
7. Test Test Test
- Open your favorite browser and point it to OpenSSO, using SSL ! (https://<your host name>:<ssl port number>/opensso)
- The browser will probably complaint about an invalid or unverifiable server certificate, this is normal, unless you have installed a genuine server side certificate on Glassfish. You can safely ignore is this warning.
- The browser will prompt you for your eID PIN code
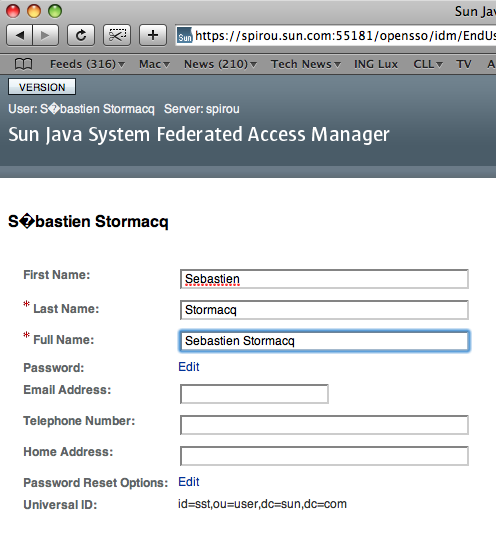
- And voila, you should be directed to your users’ profile page.
8. Tips
- When using Firefox, be sure to start Firefox after you plugin the card reader
- If you have several client side certificates installed under Firefox, it will ask you which certificate you want to use to autehnticate, be sure to use the BPELPIC certifcate (for Belgium eID cards)
- The OpenDS log file is located under <OpenSSH home>/opends/logs and contains valuable information to understand why you can’t login
To deploy this in real life, you just need to deploy an OpenSSO Web or J2EE agent in your favorite container and you will be ready to protect your application with eID authentication !
Should find errors in this blog entry, or some steps I forgot, do not hesitate to leave a comment.
Java CAPS on Mac OS X
Posted by Sébastien Stormacq in Uncategorized on 04/02/2008
The next version of Java Composite Application Platform Suite (Java CAPS, formerly Seebeyond ICANN) will be available for Mac OS X. While Sun will not support production use of this platform, we will ship a Mac OS X build for development, testing and demo purposes. I downloaded and installed our internal milestone 6 yesterday on my Macbook Pro and, so far so good, it seems to run as fine as the Solaris or Windows version.
As Netbeans and Glassfish are at the heart of this future version, and because they just run well on Mac OS X, it would have been surprising to not publish a Mac OS X build for Java CAPS.
Other platforms available for this M6 build are AIX, Linux, in addition of Windows and Solaris of course.
While this move won’t probably drastically change the adoption rate of Java CAPS, it will make the life of many developers easier, as they will be able to use the Mac as their main development or test platform, with the exact same tool as the one used for production.
Many Sun Sales Engineers and Professional Services Engineers are using Macs as well. For us too, having a native build will avoid playing with huge virtual machines images, just for the purpose of demo.
Thumbs up guys, great job – Thanks !
Implementing Fine Grained Access Control with OpenSSO
Posted by Sébastien Stormacq in Uncategorized on 02/08/2007
I tried to implement the concept presented in this excellent article from my colleagues Robert Skoczylas and Marina Sum. Their article is quite well detailed. I thought the implementation would be painless and that I should have a demo to show to partners and customers in a couple of minutes.
Actually, it was a little more complex than I originally anticipated and I would like to share and describe my experience with you. Reading the above-mentioned article is a prerequisite to understand or implement the project described here under.
The objective is to create a web application that will leverage OpenSSO (or Access Manager) for
- user authentication – with the help of the Policy Agent
- user authorization – with the help of the Policy Agent for URL authorization and a Custom Policy Service and the AM Client SDK for fine grained authorization.
The NetBeans project and some other supporting file needed to compile and run this example are also available.
To implement the concept presented in the above mentioned article, you have to
#1 Download & Install NetBeans 6.0
At the time of this writing, the latest beta version of NetBeans is 6.0 M10. Install it using a full option installation : this will install Glassfish, OpenSSO, JBI, …
The NetBeans 6.0 installer will take care of installing and configuring Glassfish and OpenSSO for you. However, you will need to change one OpenSSO configuration parameter, as the default value is incorrectly set by the installer (See CR110896).
- Open the file : <glassfish root>/domains/domain1/config/amflatfiledir/AMConfig.properties
- Change com.iplanet.am.cookie.encode=false to com.iplanet.am.cookie.encode=true
#2 Add AM Admin Tools
Access Manager comes with a set of command line tools allowing you to manage the server, add or modify services etc … Unfortunately, the OpenSSO implementation bundled with NetBeans 6M10 does not include these command line tools. You will need these tools to install a Custom Policy Service, as described below.
To get these tools, you must download the complete Access Manager 7.1 package from Sun’s web site, then follow these instructions to install them.
The only parameter that you will need to know to install the tools is the full path to your AM Config directory :
<glassfish root>/domains/domain1/config/amflatfiledir
This step is not necessary if you are implementing this sample with Access Manager 7.1, as the command line tools are installed by default.
#3 Create an AS domain to host you own application
OpenSSO is installed in the default domain, created when you installed NetBeans 6 and Glassfish. Although it is officially possible to deploy a Policy Agent on the same instance as Access Manager, I do not like the idea and prefer to keep things clearly separate. Therefore, I would advise to create a second instance of Glassfish, separate from the one hosting Access Manager, dedicated to host your home-made applications.
To create a second domain, type the following command :
<glassfish root>/bin/asadmin create-domain --user admin --adminport 14848 --domaindir <glassfish root>/domains --instanceport 18080 --savemasterpassword=true --savelogin=true webdomain
You will need to change <glassfish_root> to your Glassfish installation directory.
#4 Download and Install Policy Agent
Now that your second instance is ready to deploy your applications, you must download and install the OpenSSO policy agent. I used the nightly builds from OpenSSO and the docs from Access Manager.
The state file containing all the answers I gave for my installation is available for you to download. Do not forget to create a Policy Agent profile in OpenSSO Console before installing the agent.
#5 Create a web application to test Policy Agent installation
Next step is to create a simple web application, protect it with the policy agent to test your installation.
- Use NetBeans to craete a HelloWorld-complexity web application (or use the FineGrainedSample application I do provide with this blog)
- Modify web.xml to add the <filter> element that will enable the Policy Agent as described in the documentation. (you can also have a look at my web.xml in the NetBeans project provided with this blog entry)
- Deploy the application
- Create a user in OpenSSO console
- Create a URL Policy to authorize your user to access your application
- Access and test your application
#6 Create a custom policy service and import it to OpenSSO
Now, it is time to create a custom policy service to be used with your application. The process and concepts are clearly explained in the article I mentioned above.
I slightly changed the Service description XML file :
<?xml version="1.0" encoding="ISO-8859-1"?>
<!DOCTYPE ServicesConfiguration PUBLIC "=//iPlanet//Service Management Services (SMS) 1.0 DTD//EN""jar://com/sun/identity/sm/sms.dtd">
<ServicesConfiguration>
    <Service name="CustomPolicyService" version="1.0">
        <Schema
            serviceHierarchy="/DSAMEConfig/CustomPolicyService"
            i18nFileName="CustomPolicyService "
            i18nKey="CustomPolicyService">
            <Global>
                <AttributeSchema name="serviceObjectClasses" type="list" syntax="string"  i18nKey="CustomPolicyService"/>
            </Global>
            <Policy>
                <AttributeSchema name="bank_account_permission"
                                 type="single_choice"
                                 i18nKey="Choose Bank Account Access">
                    <IsResourceNameAllowed/>
                    <ChoiceValues>
                        <ChoiceValue i18nKey="All">ALL</ChoiceValue>
                        <ChoiceValue i18nKey="Read Only">READONLY</ChoiceValue>
                        <ChoiceValue i18nKey="Hidden">HIDDEN</ChoiceValue>
                    </ChoiceValues>
                </AttributeSchema>
            </Policy>
        </Schema>
    </Service>
</ServicesConfiguration>
and I used this command to load the file into OpenSSO
AM_TOOLS_BASE=/Applications/Others/Sun/Netbeans6_M10/amAdminTools/amserver
AM_ADMIN=uid=amadmin,ou=people,dc=sun,dc=com
ADMIN_PWD=admin123
POLICY_FILE=./CustomPolicyService.xml
$AM_TOOLS_BASE/bin/amadmin --verbose --runasdn $AM_ADMIN --password $ADMIN_PWD --schema $POLICY_FILE
#7 Call The Custom Policy service from your code
The next steps involve modifying the code in a web application to call the OpenSSO Custom Policy Service we just created.
The Java code is explained in Robert and Marina’s article. You will find it also in the NetBeans project I do provide with this blog entry.
You will need to change the NetBeans project classpath to compile it because the code refers to classes provided by the AM Client SDK. Strictly speaking, it is not necessary to install the AM Client SDK because all the required jar files and config files are already installed as part of the OpenSSO and Policy Agent installation.
I choose to use the files provided by the Policy Agent. the files you need to add to your project classpath are :
-
<policy agent root>/Agent_001/config
-
<policy agent root>/locale
-
<policy agent root>/lib/amclientsdk.jar
#8 Create users, roles and policies with OpenSSO console
I created three users and three roles.
Then I created three policies, each one giving an access level (Hidden, Read Only, Full) to each role.
#9 Deploy, Test the application and have fun !
Depending on the user you authenticate with, you will have partial or full access to all attributes on the screen.
Should you have comments, remarks about missing pieces or errors in this short tutorial, do not hesitate to leave your comments.
Building OpenSSO from Netbeans on Mac OS X
Posted by Sébastien Stormacq in Uncategorized on 25/07/2007
I spent some time to build OpenSSO from within NetBeans. My objectives were not only pedagogical, I mainly wanted to be able to run the client SDK under control of the NetBeans debugger to better understand why my code was not behaving as expected (more about my code and the sample I built in another blog entry).
While many docs are available on OpenSSO web site, it is not always easy to find where to start, which doc to use nor to fill out the missing pieces, hence this write up.
Here are the steps I followed :
- Obviously, download and install NetBeans 6 (latest milestone is M10 at the time of this writing)
- Download OpenSSO’s source code
- Follow the instruction in the README to acquire and compile the required third-party libraries
- Ensure everything compiles correctly by typing ant nightly in the top level directory of your source tree. The process took 14 min on my Mac Book Pro.
- Create the NetBeans project, following these instructions
- In the "Java Source Classpath" panel of your project’s properties add the following libs :
- <opensso root>/product/shared/built/classes
- <opensso root>/resources/jato/jato.jar
- <opensso root>/resources/lockhart/lib/cc.jar
- Give NetBeans a couple of seconds to parse the source and the new libs and … all the errors should be gone !
As an extra bonus, you can now use the CVS graphical user interface built into NetBeans to browse the revision history, view diffs etc …
I followed these steps on Mac OS X and Solaris 10 and, without surprise, the procedure is similar.
Under Mac OS X, make sure you have the development tools installed to compile the third-party libs. On Solaris, make sure you have a basic development environment (gcc, gmake and the likes) installed.
Note : these steps will only build amserver, amAdminTools, distAuth, amClientSDK, console etc … you will not get Federation nor the agents …. I will let this as an exercise for you 🙂 Please feel free to leave your comments if something is unclear, missing or incorrect.