[UPDATE March 2014]
Do not copy paste the code from the core text of this post. These are one year old scripts. An updated version is available in my GitHub Repository.
[/UPDATE]
This article describes how to run your private VPN gateway in Amazon’s cloud. Although this article describes a 100% automatic (scripted) method to start and configure your VPN server, it assumes some basic knowledge of Amazon’s EC2 platform and – obviously – requires you to have an account on EC2.
If you are totally new to EC2, I strongly advise you to follow a Getting Started guide before going through this article.
The VPN server I am using for the purpose of this article is based on IPSec / L2TP security protocols implemented by open source projects OpenSWAN and XL2LTP.
For the impatient, the scripts are available on github, along with basic configuration and setup information. Should you need more details, I encourage you to read the following.
Why a private VPN server ?
Sometime, it is legitimate to create an encrypted tunnel of data to another machine on the internet. Think about situations like
- Being connected on a public network in an hotel, a conference, a restaurant or coffee shop
- Willing to escape your ISP or Service Provider limitations (Belgium DNS Blocking, French Hadopi, …)
- Accessing services not being distributed in your country (Deezer, Spotify etc ..)
- or simply to ensure no one can snoop your network traffic
How to start a customised machine on EC2 ? Some Background.
AWS provides several ways to start customised machines. Either you can create your own virtual machine image (AMI) based on one of the many images available. Either you can start a standard image and run a script at startup time to customise it. Either you can boot from an EBS backed machine image (AMI) and create a snapshot of your root volume.
The first method is more labor intensive (install the software, maintain the image, …) and more expensive (you have to pay for the storage of your customised image) but has the advantage of faster startup times as the image does not need to install and to configure required softwares at boot time.
Running a script at boot time is easier as you do not need to enter into the details of creating and maintaining custom images. It is cheaper as you do no need to store that custom image. But the machine is slower to boot as it requires to download, install and configure required softwares at every boot. This is the method I choose to setup the VPN server.
The latter method (EBS Snapshot of root volume) is described in extenso in the documentation and – based on my own experience – provides the best ratio between labour, price and effectiveness. This is probably the method I would recommend for production workloads.
But … How to start a customisation / installation script just after booting a standard linux distribution or one of the prepared Amazon Machine Image ? This is where cloud-init kicks in.
Cloud-Init is an open source library initiated by Canonical (the maker Ubuntu) to initialise Virtual Machines running in the cloud. It allows, amongst others, to do post-boot configuration like
- setting the correct locale
- setting the hostname
- initialising (or installing) ssh keys
- setup mount points
- etc …
It also allows to pass a user defined script to the instance to perform any additional setup and configuration tasks. This is the technique I am using to download, install, configure and start IPSec and L2TP daemons on the server.
Cloud-Init is included by default in Ubuntu machine images and in Amazon Linux machine images on EC2.
For the purpose of this article, I choose to use the Amazon Linux machine image because it is lightweight and specifically designed to run on EC2.
This is enough background information, let’s start to do real stuffs.
How to start a machine from your command line ?
To start an EC2 instance form your machine command line, you will need the following :
- an Amazon Web Service account and a credit card 🙂
- to create a SSH key pair
- to create a VPN security group
The VPN Security Group must allow TCP and UPD port 500 and UPD port 4500 as shown on the screenshot below.
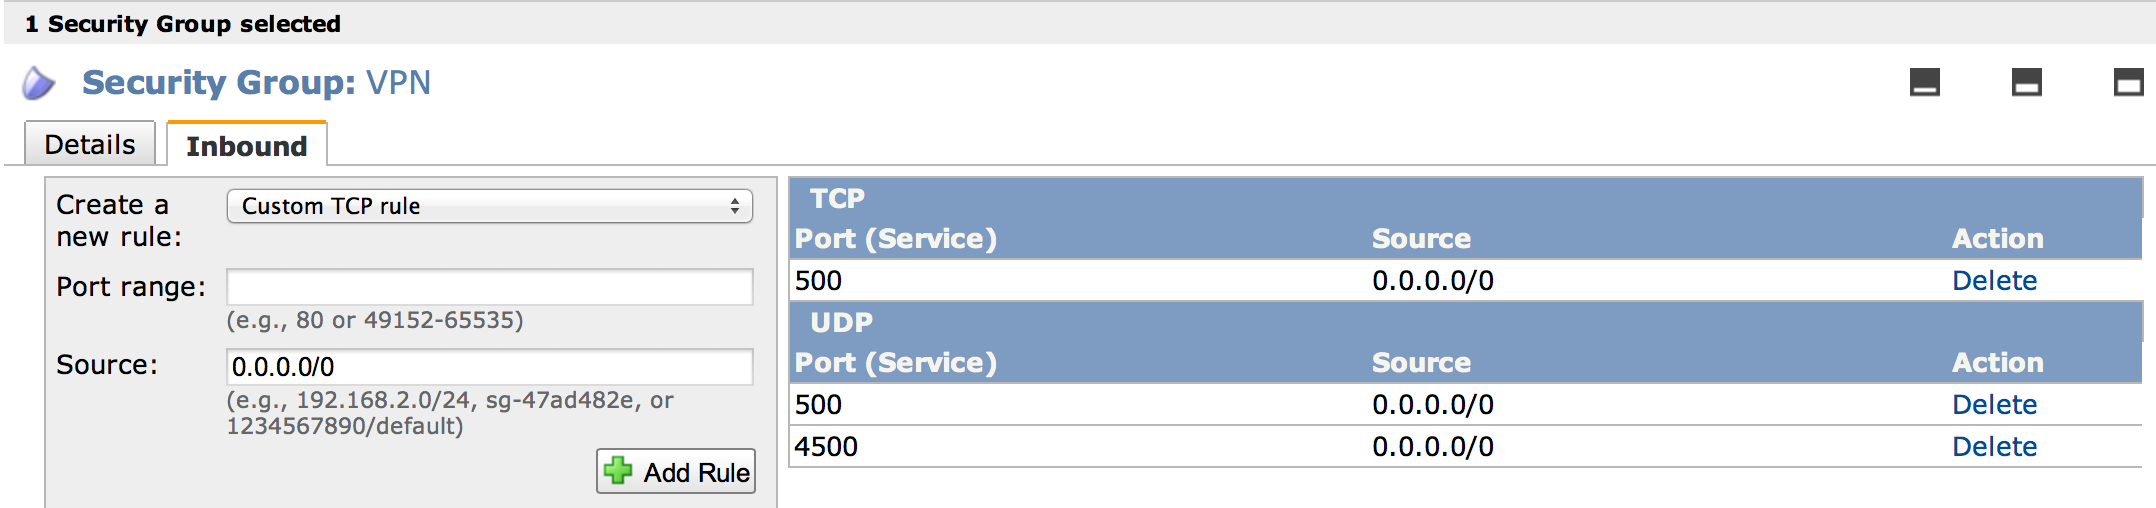
VPN Security Group
Please refer to the getting started guide to learn how to perform these. Be sure to write down the name of your key pair and the name of your security group as we will need these later.
Once your basic setup of EC2 is done, you will need to install and configure EC2 Command line tools on your machine.
- Download and Install EC2 Command Line Tools
- Configure your environment
To configure your environment, you will need to setup a couple of environment variables, typically in $HOME/.profile
- EC2_HOME environment variable points to command line tools
- EC2_URL environment variables contains AWS endpoint (http://docs.aws.amazon.com/general/latest/gr/rande.html#ec2_region)
- AWS_ACCESS_KEY environment variable contains your AWS access key
- AWS_SECRET_KEY environment variable contains your AWS secret key
Do not change the name of these environment variables as these are used in the script.
For example, here is my own .profile file (on Mac OS X) :
export JAVA_HOME=`/usr/libexec/java_home` export EC2_HOME=/Users/sst/Projects/aws/ec2-api-tools-latest export AWS_ACCESS_KEY=<access key> export AWS_SECRET_KEY=<secret key> export EC2_URL=http://ec2.eu-west-1.amazonaws.com |
Once this setup is done, you can start to use the EC2 command line tools as demonstrated in the script below :
1 2 3 4 5 6 7 8 9 10 11 12 13 14 15 16 17 18 19 20 21 22 23 24 25 26 27 28 29 30 31 | #to be run on my laptop # create and start an instance #AMI = AMZN Linux 64 Bits #AMI_DESCRIPTION="amazon/amzn-ami-pv-2012.09.0.x86_64-ebs" AMI_ID=ami-c37474b7 KEY_ID=sst-ec2 SEC_ID=VPN BOOTSTRAP_SCRIPT=vpn-ec2-install.sh echo "Starting Instance..." INSTANCE_DETAILS=`$EC2_HOME/bin/ec2-run-instances $AMI_ID -k $KEY_ID -t t1.micro -g $SEC_ID -f $BOOTSTRAP_SCRIPT | grep INSTANCE` echo $INSTANCE_DETAILS AVAILABILITY_ZONE=`echo $INSTANCE_DETAILS | awk '{print $9}'` INSTANCE_ID=`echo $INSTANCE_DETAILS | awk '{print $2}'` echo $INSTANCE_ID > $HOME/vpn-ec2.id # wait for instance to be started DNS_NAME=`$EC2_HOME/bin/ec2-describe-instances --filter "image-id=$AMI_ID" --filter "instance-state-name=running" | grep INSTANCE | awk '{print $4}'` while [ -z "$DNS_NAME" ] do echo "Waiting for instance to start...." sleep 5 DNS_NAME=`$EC2_HOME/bin/ec2-describe-instances --filter "image-id=$AMI_ID" --filter "instance-state-name=running" | grep INSTANCE | awk '{print $4}'` done echo "Instance started" echo "Instance ID = " $INSTANCE_ID echo "DNS = " $DNS_NAME " in availability zone " $AVAILABILITY_ZONE |
You will need to slightly customise this script to make it run :
- Line 5 : check what is the AMI ID in your geography
- Line 6 : replace “sst-ec2” with the name of your ssh key pair
- Line 7 : replace “VPN” with the name you choose for your Security Group
How is it working ?
10 11 12 | echo "Starting Instance..." INSTANCE_DETAILS=`$EC2_HOME/bin/ec2-run-instances $AMI_ID -k $KEY_ID -t t1.micro -g $SEC_ID -f $BOOTSTRAP_SCRIPT | grep INSTANCE` echo $INSTANCE_DETAILS |
This script starts an EC2 instance (line 11) of the given type with the specified SSH key pair and Security Group. It uses the “-f” option to pass a cloud-init user data script that will download install and configure IPSec and L2TP once the machine is booted.
18 19 20 21 22 23 24 25 26 | # wait for instance to be started DNS_NAME=`$EC2_HOME/bin/ec2-describe-instances --filter "image-id=$AMI_ID" --filter "instance-state-name=running" | grep INSTANCE | awk '{print $4}'` while [ -z "$DNS_NAME" ] do echo "Waiting for instance to start...." sleep 5 DNS_NAME=`$EC2_HOME/bin/ec2-describe-instances --filter "image-id=$AMI_ID" --filter "instance-state-name=running" | grep INSTANCE | awk '{print $4}'` done |
The script then waits for the machine to be ready (lines 19-26) and, once available, the script reports the machine public DNS name (to be used to configure your VPN client software) (line 30 – 31)
How to Install and to Configure VPN into your new machine ?
Now that the machine is started, it receives the customisation script through the -f option. Cloud-Init will execute this script to finalise the setup of the machine.
Here is the script allowing to install and configure IPSec and L2TP automatically. Some details are given after the code.
1 2 3 4 5 6 7 8 9 10 11 12 13 14 15 16 17 18 19 20 21 22 23 24 25 26 27 28 29 30 31 32 33 34 35 36 37 38 39 40 41 42 43 44 45 46 47 48 49 50 51 52 53 54 55 56 57 58 59 60 61 62 63 64 65 66 67 68 69 70 71 72 73 74 75 76 77 78 79 80 81 82 83 84 85 86 87 88 89 90 91 92 93 94 95 96 97 98 99 100 101 102 103 104 105 106 107 108 109 110 | #!/bin/sh # Please define your own values for those variables IPSEC_PSK=SharedSecret VPN_USER=username VPN_PASSWORD=password # Those two variables will be found automatically PRIVATE_IP=`wget -q -O - 'http://instance-data/latest/meta-data/local-ipv4'` PUBLIC_IP=`wget -q -O - 'http://instance-data/latest/meta-data/public-ipv4'` yum install -y --enablerepo=epel openswan xl2tpd cat > /etc/ipsec.conf <<EOF version 2.0 config setup dumpdir=/var/run/pluto/ nat_traversal=yes virtual_private=%v4:10.0.0.0/8,%v4:192.168.0.0/16,%v4:172.16.0.0/12,%v4:25.0.0.0/8,%v6:fd00::/8,%v6:fe80::/10 oe=off protostack=netkey nhelpers=0 interfaces=%defaultroute conn vpnpsk auto=add left=$PRIVATE_IP leftid=$PUBLIC_IP leftsubnet=$PRIVATE_IP/32 leftnexthop=%defaultroute leftprotoport=17/1701 rightprotoport=17/%any right=%any rightsubnetwithin=0.0.0.0/0 forceencaps=yes authby=secret pfs=no type=transport auth=esp ike=3des-sha1 phase2alg=3des-sha1 dpddelay=30 dpdtimeout=120 dpdaction=clear EOF cat > /etc/ipsec.secrets <<EOF $PUBLIC_IP %any : PSK "$IPSEC_PSK" EOF cat > /etc/xl2tpd/xl2tpd.conf <<EOF [global] port = 1701 ;debug avp = yes ;debug network = yes ;debug state = yes ;debug tunnel = yes [lns default] ip range = 192.168.42.10-192.168.42.250 local ip = 192.168.42.1 require chap = yes refuse pap = yes require authentication = yes name = l2tpd ;ppp debug = yes pppoptfile = /etc/ppp/options.xl2tpd length bit = yes EOF cat > /etc/ppp/options.xl2tpd <<EOF ipcp-accept-local ipcp-accept-remote ms-dns 8.8.8.8 ms-dns 8.8.4.4 noccp auth crtscts idle 1800 mtu 1280 mru 1280 lock connect-delay 5000 EOF cat > /etc/ppp/chap-secrets <<EOF # Secrets for authentication using CHAP # client server secret IP addresses $VPN_USER l2tpd $VPN_PASSWORD * EOF iptables -t nat -A POSTROUTING -s 192.168.42.0/24 -o eth0 -j MASQUERADE echo 1 > /proc/sys/net/ipv4/ip_forward iptables-save > /etc/iptables.rules cat > /etc/network/if-pre-up.d/iptablesload <<EOF #!/bin/sh iptables-restore < /etc/iptables.rules echo 1 > /proc/sys/net/ipv4/ip_forward exit 0 EOF service ipsec start service xl2tpd start chkconfig ipsec on chkconfig xl2tpd on |
As promised, here are some details
- Lines 4-6 defines your security credentials for the VPN. They must be changed before executing this script.
- Line 12 uses yum to install IPSec & L2TP implementation (OpenSWAN and xl2tpd) from the Amazon’s provided EPEL repository
- Lines 14-93 creates IPSec and L2TP configuration files, reusing the credentials you provided at the head of the script.
- Lines 95-96 setup proper network NATing
- Lines 98-105 ensure the network NATing settings will be restored in case the network interface is shutdown and up again.
- Finally, lines 107-110 start required services and ensure they will be restarted in case of reboot.
Congrats for those of you still reading. You now should have a valid VPN server running in the cloud. If everything went well, you should now be able to configure your VPN client.
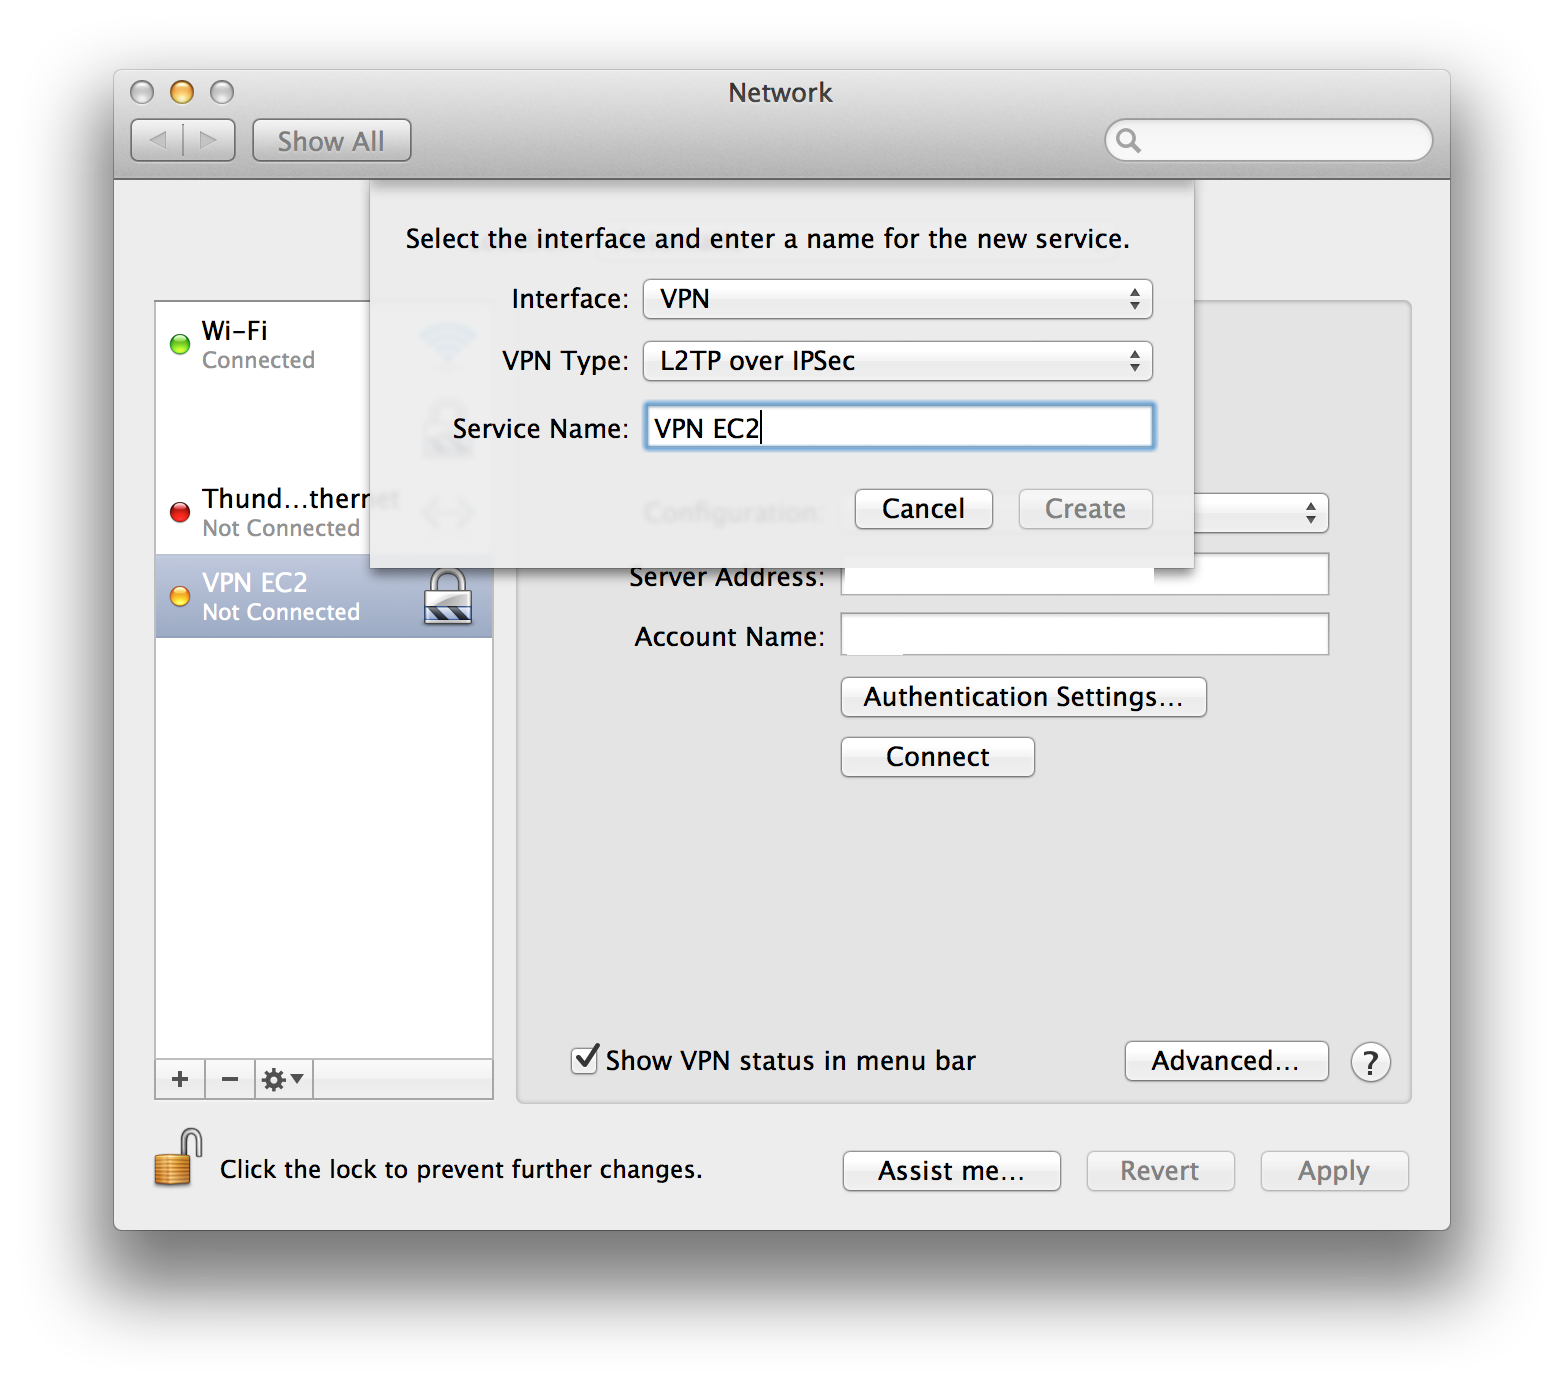
How to connect from Mac OS X ?
Once the server is up and running, you simply add a VPN interface in your Network Preferences
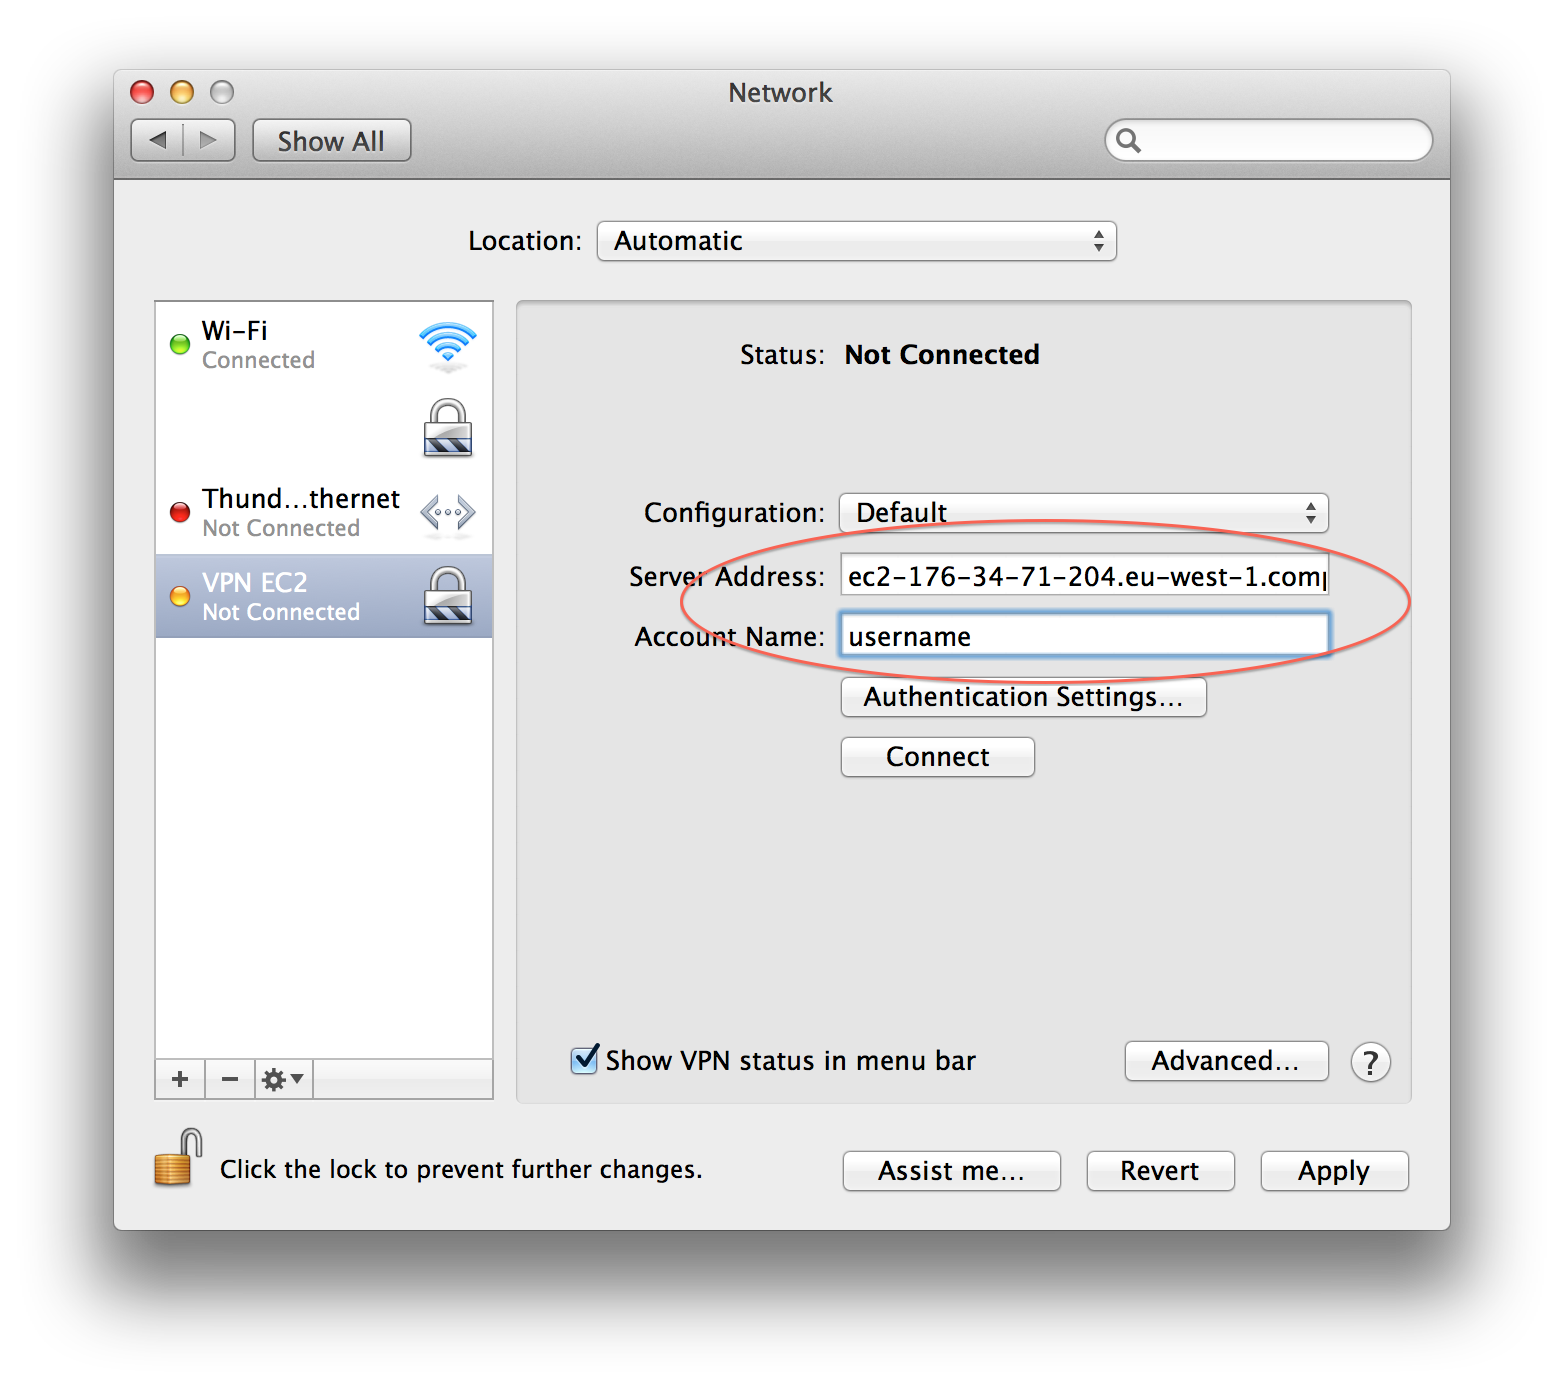
Then, use the public DNS hostname as server address and your username, as shown below
Finally, click on “Authentication Settings” to enter the shared secret and your password.
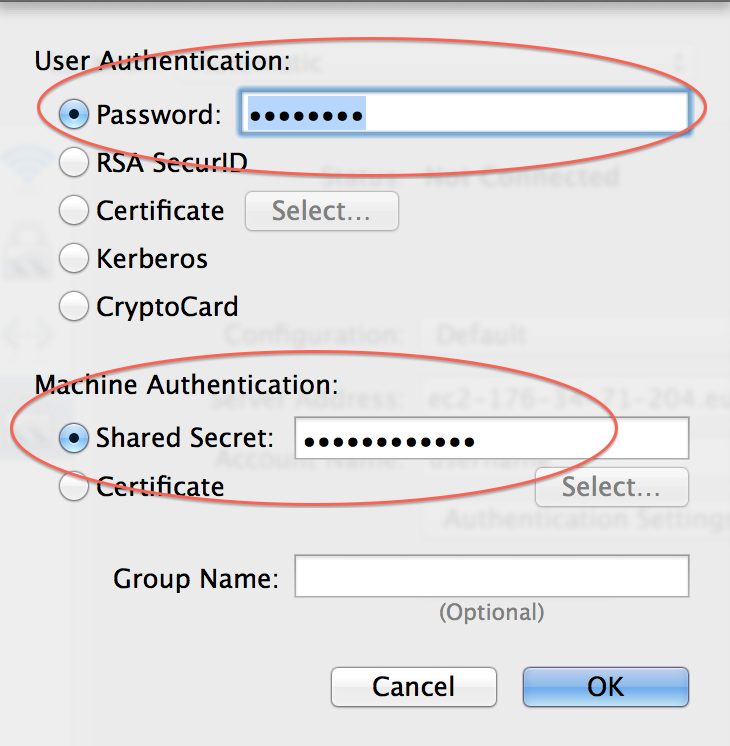
Then click on Apply, then Connect
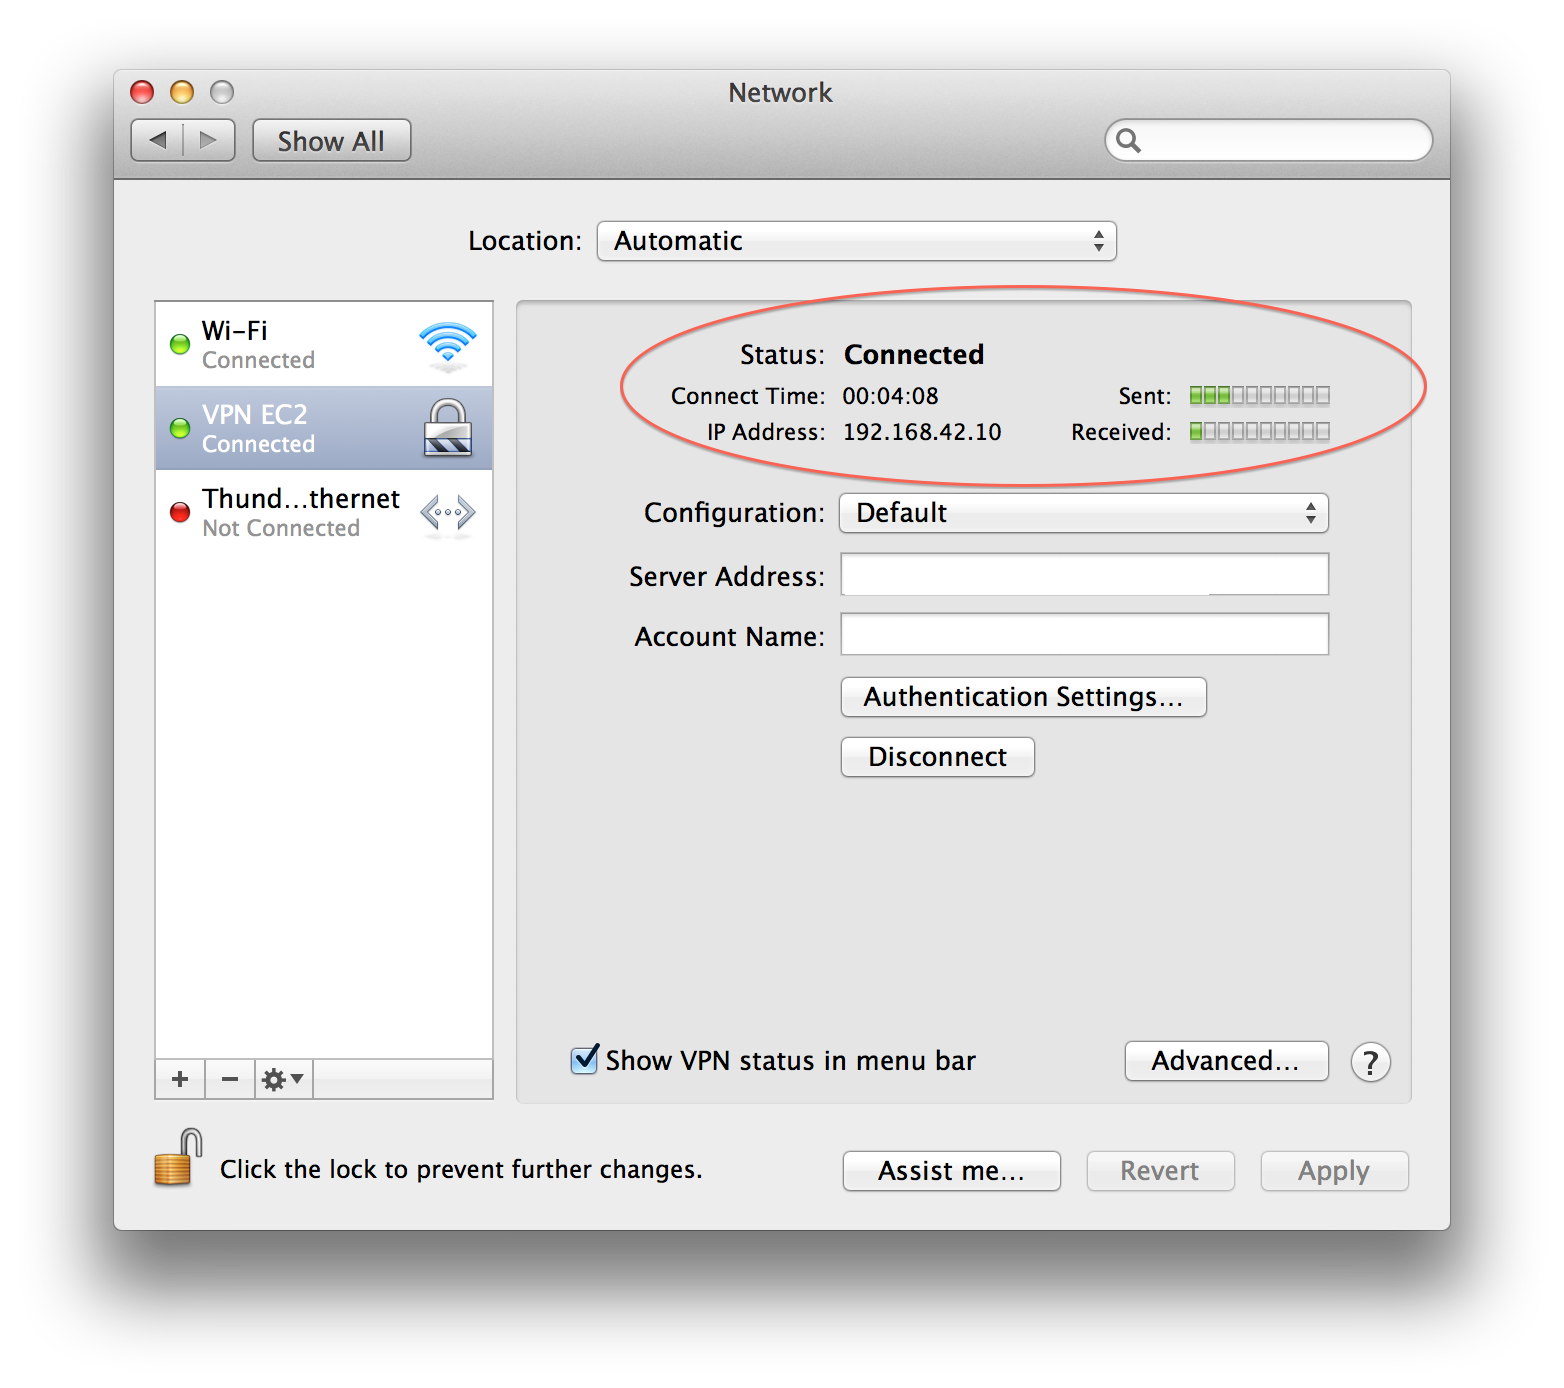
If everything is OK, you should connect to your new VPN Server.
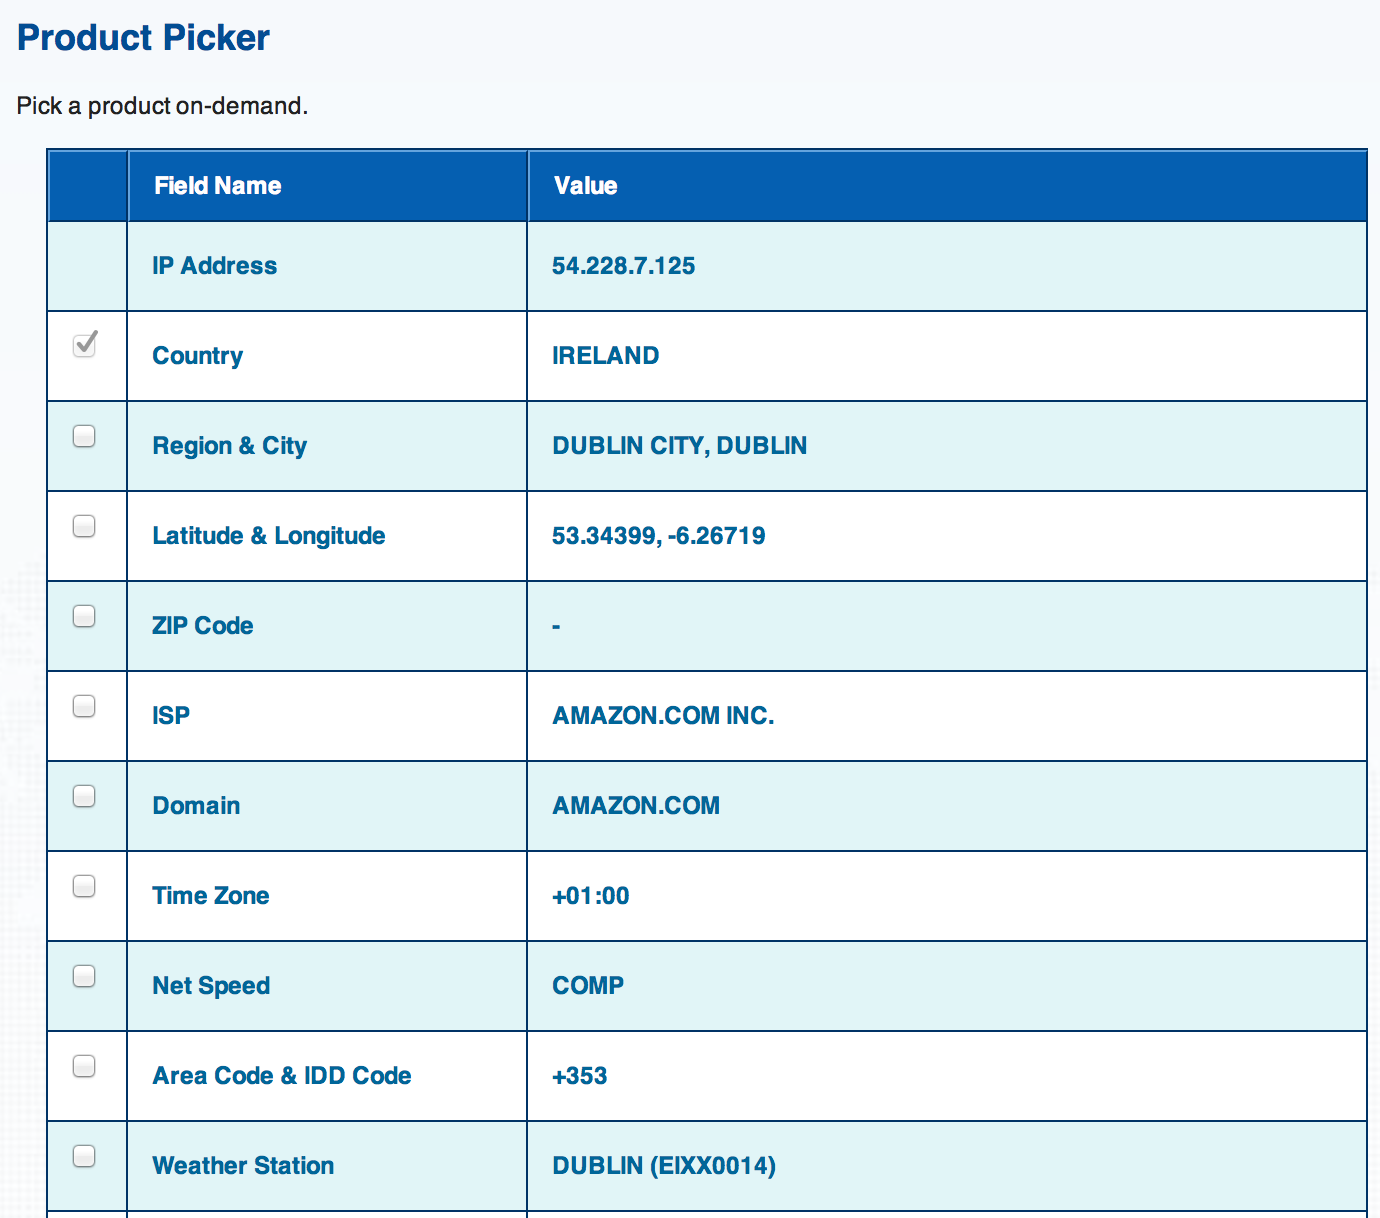
How to be sure you’re connecting through the VPN ?
The easiest way to check that indeed all your network traffic is routed through the VPN tunnel is to connect to one of the many IP Address Geolocalisation web sites.
The web site I found on Google reported an Amazon IP address from Ireland, which is the geographical region I choose to deploy my VPN server.
A note for Windows users
Microsoft published an extensive technical note describing the details of setting up a IPSec client on Windows.
Also, Windows does not support IPsec NAT-T by default, which is used whenever the server is behind a NAT (as in this case). You have to add a registry key to enable this – see http://support.microsoft.com/kb/926179/en-us (still applies to Windows 8)
How to hook up a DNS alias to avoid to change client configuration ?
Every time you will startup a new VPN server, you will need to enter its public DNS name to your VPN client configuration. It is possible to avoid this if you have a domain name of your own, just by creating a DNS CNAME record pointing to the public DNS address of your server, such as
vpn.mydomain.com CNAME ec2-176-34-71-204.eu-west-1.compute.amazonaws.com.
If you are using Amazon’s Route 53 DNS service, this step can be entirely automated using scripts. More about this in another article.
Congrats if you manage to read this article to the end. Once again, the script source code is available on GitHub.
Enjoy !
#1 by Jens on 06/06/2013 - 18:57
I have been trying to do just this, so thanks for doing this tutorial.
However, I seem to run into a problem with the script on this line:
cat > /etc/network/if-pre-up.d/iptablesload <<EOF
There is no /etc/network directory, so this line fails with a:
./installvpn.sh: line 100: /etc/network/if-pre-up.d/iptablesload: No such file or directory
Maybe Amazon updated the Amazon Linux that broke this somehow? Not being a CentOS pro, I don't know how to work around this.
Also, it took me a while before I figured out that I should use the github version of the script, which seems to be update compared to this blog.
#2 by Jens on 06/06/2013 - 19:01
Forgot to say that since I didn’t have the AWS command line tools installed, I launched the instance manually through AWS, which launches 2013.03.1 rather than 2013.03.0 that you specified, which might be the source of the problem.
#3 by Sébastien Stormacq on 01/09/2013 - 11:41
Hello Jens,
I just updated the GitHub repository at https://github.com/sebsto/AWSVPN
with an up-to-date and working version of the script
Enjoy !
#4 by Jens Andersson on 27/09/2013 - 17:40
Wonderful, works like a charm! Took a bit of fiddling to get it to work under Windows, but the links you provided solved that as well.
#5 by Jens on 23/10/2013 - 10:58
Actually, I’m still having an issue. It works great when I launch the server, run the script and connect. But if I stop and restart the server, it won’t connect any longer. From what I can tell, the two deamons are running, so I’m not sure why.
#6 by Sébastien Stormacq on 23/10/2013 - 11:12
This is normal – when you stop / start an EC2 instance, it receives a different IP address.
and the public and private IP are burned into ipsec configuration at installation time (see
/etc/ipsec.conf)I would suggest to not stop /start but rather Terminate and run a new instance. Or to add a script in
/etc/rc3.d/to update/etc/ipsec.confdynamically at startup time.#7 by Daniel on 04/11/2013 - 09:04
You could use an Elastic IP for the instance, saving having to re-initialize the server every time you wan’t to use it. It will only cost $0.005 per hour ($3.60 Per Month) it’s not attached to the server, but rather reserved for use with that particular server.
#8 by Sébastien Stormacq on 04/11/2013 - 09:52
Daniel,
Thank you for the suggestion. Elastic IP addresses will also solve this problem.
I did not mention it for two reasons :
Because of these two points, I prefer to use a “cloud way” of managing this : trashing the machine when not in use and spawning a new one when I need it.
#9 by rhel user on 06/12/2013 - 21:38
+ service xl2tpd start
Redirecting to /bin/systemctl start xl2tpd.service
Job for xl2tpd.service failed. See ‘systemctl status xl2tpd.service’ and ‘journalctl -xn’ for details.
systemctl status xl2tpd.service
xl2tpd.service – Level 2 Tunnel Protocol Daemon (L2TP)
Loaded: loaded (/usr/lib/systemd/system/xl2tpd.service; enabled)
Active: failed (Result: exit-code) since Fri 2013-12-06 20:33:06 UTC; 12s ago
Dec 06 20:33:06 xyz.localdomain systemd[1]: xl2tpd.service: control process exited, code=exited status=1
Dec 06 20:33:06 xyzlocaldomain systemd[1]: Failed to start Level 2 Tunnel Protocol Daemon (L2TP).
Dec 06 20:33:06 xyz.localdomain systemd[1]: Unit xl2tpd.service entered failed state.
#10 by Sébastien Stormacq on 07/12/2013 - 17:37
I never tested on RHEL. I was using Amazon Linux instead
#11 by Matt on 22/12/2013 - 04:01
Hello – Thanks for the script / info! Are there any modifications needed for the Amazon AMI 2013.09.2? I can successfully launch an instance, but I can’t connect to it from my devices after it is running. I am also unable to telnet in on any of the ports I opened via the security group (except SSH, but I knew it was open as I could SSH into the server). Thanks!
#12 by Sébastien Stormacq on 22/12/2013 - 08:33
Hello Matt,
I did not test it with the latest AMI (published on Dec 12 2013) – Let me do that and I will post on updated version if necessary
[UPDATE]
I just tested with ami-5256b825 (Amazon Linux 2013.09.02, PV, 64 Bits, eu-west) and it works as expected.
I also took the occasion to update the script to use the new command line interface, the GitHub repository is up-to-date https://github.com/sebsto/AWSVPN
[/UPDATE]
Thanks for your feedback !
Seb
#13 by Matteo on 10/01/2014 - 23:52
Everything seems to work perfectly, but I’m not able to connect. I’m not a networking expert, so can you help me in the troubleshooting?
In my mac logs I’ve found this:
Fri Jan 10 23:36:09 2014 : publish_entry SCDSet() failed: Success!
Fri Jan 10 23:36:09 2014 : publish_entry SCDSet() failed: Success!
Fri Jan 10 23:36:09 2014 : L2TP connecting to server ‘ec2-54-236-133-104.compute-1.amazonaws.com’ (54.236.133.104)…
Fri Jan 10 23:36:09 2014 : IPSec connection started
Fri Jan 10 23:36:09 2014 : IPSec phase 1 client started
Fri Jan 10 23:36:09 2014 : IPSec phase 1 server replied
Fri Jan 10 23:36:10 2014 : IPSec phase 2 started
Fri Jan 10 23:36:40 2014 : IPSec connection failed
I’m working with us-east-1 region, AMI ami-bba18dd2
thanks
#14 by Dane Skow on 01/02/2014 - 23:08
I seem to have similar troubles to Matteo, in that the instance starts up properly, yet I’m not able to establish the VPN (error message: “The L2TP-VPN server did not respond. Try reconnecting. If the problem continues, verify your settings and contact your Administrator.”
However, I’m even less savvy as I’m not sure where to look for log information (even though I’ve set the logging to verbose in the network configuration screen.).
Thanks for any help you can provide. Especially if it’s in time for me to watch the SuperBowl !! 😉
#15 by Sébastien Stormacq on 02/02/2014 - 08:30
Hello,
Sorry to hear you have problems with this.
The logs are usually located in /var/logs/messages
I also further automated the process. I am now using this cloud formation template and this bootstrap script. You might give them a try.
Cloud formation template :
https://github.com/AWSTrainers/route53_lbr_demo/blob/master/cfn-route53-latency-demo-vpn.json
Bootstrap script :
https://github.com/AWSTrainers/route53_lbr_demo/blob/master/vpn-bootstrap.sh
Let me know if you can make it work before the game 🙂
Seb
#16 by bill on 03/02/2014 - 10:38
Hello, I’ve followed your guide closely until the running the script part. I’m on Windows 7. I have the EC2 CLT setup with enviromental variables working properly. I’m not sure what I should use to run the script afterwards. I’ve tried powershell but it doesn’t seem to do anything.
#17 by Sébastien Stormacq on 03/02/2014 - 11:11
Hello,
The scripts are built to run on Linux and OS X. They will not work on Windows.
Sorry for that. You should build an equivalent script in Powershell for Windows
Seb
#18 by bill on 03/02/2014 - 11:13
Ah, I see. I’ll look into running off a virtual machine. Thank you for your clarification.
#19 by Jeremy Glover on 26/03/2014 - 01:50
Thank you so much for the scripts! I got it working, but had to manually get the IP from the AWS console. I’m using version 1.3.3 of the AWS CLI tools and I did some debugging.
When I run the following command, the output is a “requestId”, not an “Instances”, and so the vpn-ec2-start.sh script just stays in a loop because the server status can never be polled successfully as it is.
The command is:
aws ec2 run-instances –image-id $AMI_ID –key-name $KEY_ID –security-groups $SEC_ID –instance-type t1.micro –user-data file://./$BOOTSTRAP_SCRIPT –output text
And the response is a GUID. Example: 87be1dd3-f489-4fdc-9681-fe5514b0e928.
I removed the “–output text” from the command so I could see the full response and this is what I got on a subsequent run of the command.
{
“Instances”: [],
“Groups”: [],
“requestId”: “77d23a97-aa5d-4649-8cb7-33a878d5f4e3”
}
It looks like Amazon changed it so maybe you have to poll AWS using the requestId and then it’ll give you the Instances?
Please take a look and let me know if you need any more info.
Thanks for the great work!
#20 by Sébastien Stormacq on 31/03/2014 - 21:48
Hello,
These scripts are indeed one year old and I should do some cleaning on it. Thanks for having spotted this!
I do maintain an updated version on GitHub. This updated version has been modified to use AWS CLI, check https://github.com/sebsto/AWSVPN/blob/master/vpn-ec2-start.sh
Thank you for your feedback !
Seb
#21 by Jeremy Glover on 01/04/2014 - 05:11
The code from GitHub is what I was using. My guess is that Amazon changed the output with the newest version of the AWS CLI which is why the script can’t parse the output correctly now.
Specifically, I think line 28 of vpn-ec2-start.sh isn’t working right now with the “grep INSTANCES” portion since AWS returns a request ID instead of the instance ID.
Let me know if you need any more info and keep up the good work 🙂
#22 by Tom B on 12/08/2014 - 03:47
I’ve been using AWS as a dovecot/postfix mail server for my domain. I was wondering if there was any extra charge for all the data going through the site beyond the regular AWS? would hate to turn this on and double my bill, or worse.
I was thinking of using it to secure my router (mikrotik) to the internet connection so that anything TWC does they can’t figure out what my packet types are.
#23 by Sébastien Stormacq on 12/08/2014 - 11:55
Hello Tom,
All traffic going out of an Amazon EC2 instances to the Internet is charged $0.12 GB/Month (First GB is free). Check the “Data Transfer” section at http://aws.amazon.com/ec2/pricing/
Seb
#24 by Fang on 21/09/2014 - 17:00
Hello from Shanghai.
In China visiting the gf.
Using her company’s two vpns and everything ten clicks I’m able to read/load a gmail.
Before I chunk out real change I’m going to to give your tutorial a go.
Thanks in advance…
#25 by Mael on 30/09/2014 - 12:17
Hi Seb,
Great post!
Beware of the environment variables though:
AWS_ACCESS_KEY => AWS_ACCESS_KEY_ID
AWS_SECRET_KEY => AWS_SECRET_ACCESS_KEY
http://docs.aws.amazon.com/cli/latest/userguide/cli-chap-getting-started.html
Mael
#26 by Vyom on 24/10/2014 - 09:50
What kind of Bandwidth and throughput have you seen using this solution.
I have a router which supports IPsec/L2TP and I was wondering if I can use the solution to stream movies 🙂 from India
#27 by Jason on 23/04/2015 - 17:59
You can setup your own VPN server on AWS in 10 minutes. It uses an Amazon service called cloudformation. no need to SSH and so on https://www.webdigi.co.uk/blog/2015/how-to-setup-your-own-private-secure-free-vpn-on-the-amazon-aws-cloud-in-10-minutes/
#28 by mikola on 09/11/2015 - 14:17
thanks for great article!
i followed instructions and it works 🙂
can you please tell me how is it possible to add more VPN users or to use the same credentials on multiple devices?