Archive for category Java
Fun with JavaFX, how to subclass UI controls
Posted by Sébastien Stormacq in Java on 15/06/2009
While I was doing a JavaFX demo to a group of partners, someone asked the questions : “Does JavaFX provides more specialized UI controls, like SearchTextBox, Table etc … ?”
As of today, JavaFX 1.2 proposes this list of controls and, of course, it is relatively easy to subclass these to get the behavior you want.
But I wondered how easy it really might be, so I tried.
| My goal was to create a “Search Text Box”, you know ? These TextBoxes used in Apple’s iTunes for example to clearly indicate that this control is to search.
It has a small glass in the front of the text area and a “cancel” button appears when text is typed to allow user to reset it’s content in a click. It took me a couple of hours to create it, here is the result on the right side. |
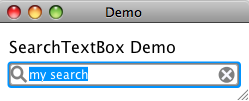 |
I basically extended JavaFX 1.2 TextBox control and added two groups :
- One is the “Cancel” button, made of gray Circle and two Rectangles
- The other is the glass, made of one Circle and one Rectangle
I positioned these inside the TextBox, relatively to the original control’s size.
I added two callback functions to notify about possible events : new search text is available (onSearchItemAvailable) and search is reset (onResetSearch).
I finally struggled a little bit to find a way to prevent text to draw itself beneath these two icons. It was solved using the skin’s padding-left and padding-right CSS attributes (Thanks Philippe from Sun’s Developpers Forum to point me in the right direction).
You can download the full source code here or you can start the test application directly from this page by clicking on the image below.
As usual, comments and remarks are welcome.
[UPDATE – JAVAFX 1.3]
In October 2010, Oracle released Java FX 1.3 with incompatible changes in the API. Direct consequence is that this example is not compiling anymore. I posted the explanation and an up-to-date version, ready for Java FX 1.3. Have Fun !
Next JUG Event : Java & Web Applications Security
Posted by Sébastien Stormacq in Java on 12/05/2009
The next YaJuG (the Luxembourg Java User Group) event will cover some security topics for Java developers :
- How to implement cryptography (encryption, key generation, signature, etc.) from within your Java applications
- A review of the Java top-10 security breaches in your web applications.
More details and registration are available online. Book your agendas : May, the 27th 2009
GlassFish Tools for Eclipse are available
Posted by Sébastien Stormacq in Java on 24/03/2009
Sun is making available GlassFish Tools for Eclipse (v0.9, final version to be release soon). This is a pre-configured package containing Eclipse 3.4.1 alongside with GlassFish v2.1 and GlassFish v3 prelude and the required Eclipse plugins to effectively manage and deploy applications to GlassFish right from the IDE.
Q: Who is the target for this offering?
A: Developers or organizations that have already standardized on or prefer Eclipse over NetBeans.
Q: Why has Sun created this offering?
A: Sun has created a strong preference for GlassFish among NetBeans users. However, a large community of developers have chosen Eclipse as their IDE of choice. Today those developers have to download open source products from multiple locations and configure them to work together (error prone), increasing the barrier to entry. This offering creates a positive feature-rich out-of-the-box experience for Eclipse developers. In additional, developers can now leverage the open source plugins created by competitive frameworks (Spring, SEAM, Hibernate, etc) within a GlassFish-focused IDE. This bundle will also improve the relationship between the community of Eclipse developers and Sun.
Q: Is Sun moving away from Netbeans towards Eclipse?
A: No. Sun is expanding its reach by embracing not just the NetBeans developer community, but also the Eclipse community. This is a consistent with Sun’s strategy of using open source to "lower the barrier to entry" – in this case to a large developer community.
JavaFX within WebSpace Portlets
Posted by Sébastien Stormacq in Java on 25/02/2009
I am attending a WebSpace bootcamp this week, which gives me some extra time to discover Sun’s new Identity Based Content Portal.
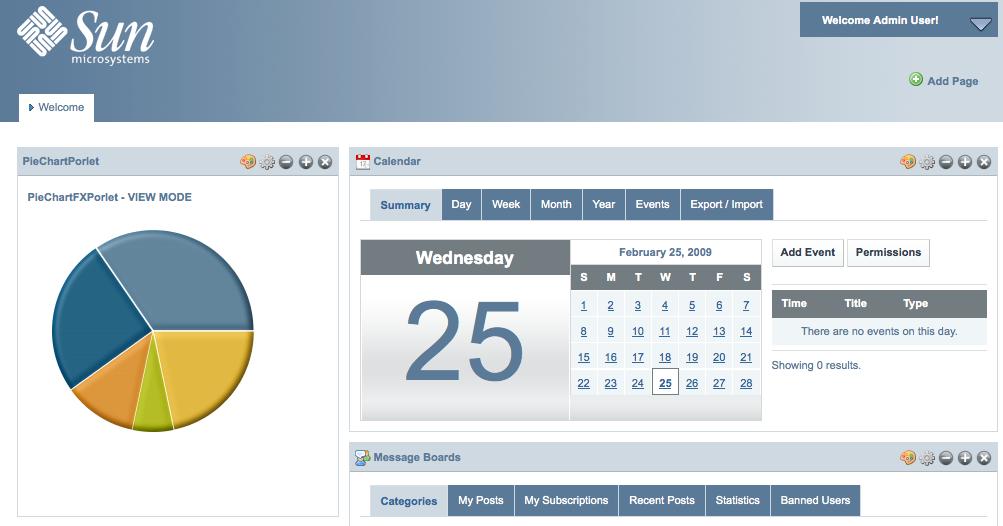
I couldn’t resist to try to deploy my JavaFX PieChart application in a JSR 268 portlet.
Here is the result
Here are a few caveats / things to know
-
Use NetBeans’ project properties on the JavaFX side to generate the required HTML and proper embedding of the JavaFX librairies. Choose “Run” category, then specify “Run in a browser”. This will generate the HTML for you
-
Create a Web Application / JSR 268 Portlet project and copy/paste the HTML from the previous step to the portlet view JSP
-
Deploy the WAR file using Web Space admin tool (the web based Control Panel – Plugin Installer)
-
Add the portlet to an organization / community / user page.
Be careful about the path to your JAR file, it must be downloadable from your client browser. WebSpace overwrites the main context-root “/” and redirects everything to its own pages. I was lazy and just pointed to a file:/// URL 🙁
Have Fun !
Create a reusable PieChart component with JavaFX – Part II
Posted by Sébastien Stormacq in Java on 22/02/2009
In my previous blog entry, I described how to build a reusable PieChart component with JavaFX.
In this blog entry, we will improve the component to make it visually more appealing :
-
we will add a small space between pieces of the pie
-
we will add a 3D like effect to the component
-
we will add behavior : when the user will move the mouse over one of the piece, it will slightly step outside the chart.
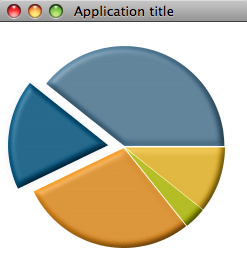
End result will be like this :
| Before: | After: |
|
|
 |
The 3D effect
Let’s start with the simplest modification, the 3D effect.
JavaFX does provide with many lightning effects that can be applied either to simple, individual component or to complete scene.
Many of these lightning effects create 3D like effects on the component they are applied.
To achieve the effect shown above, I just added a DistantLight effect to the component, as show below.
 public override function create(): Node {
     return Group {
        content: bind ARCS;
        effect: Lighting {
           light: DistantLight {
             azimuth: 225
              elevation: 60
           }
           surfaceScale: 3
        }
    }
 }
The three first line are taken from my previous code. It creates a subclass of Node, for which the content is an array of ARC. Please read the previous blog entry to have details about this.
I added to the group an effect attribute. This attribute contains a Lighting instance which, in turn, contains a DistantLight lighting effect.
This is as simple as this, it will create the lighting and shadow effects to create the illusion of a 3D component.
Back to your Math basics
The other changes will require some math first …
We want to move a piece of the chart outside the pie chart when the mouse is over it.
Moving an Arc is easy, JavaFX provides us with many transformations, including a simple TranslateTransformation that will move the Arc from a source coordinate (a,b) to a destination coordinate (x,y).
The source point is well known, it is the center of the PieChart component. How can we compute the destination point ?
The target point dependents on two factors : the direction where we will move the piece and the distance from the center where we want to stop.
For the direction, we will use the angle in the middle of the arc, i.e. (end angle – start angle) / 2
For the distance, we will use a percentage of the radius, 15% in this case (you might wonder how I found 15% … it was using trial and mistake approach, 15% seems to give the best result, feel free to use whatever other value you like)
So, how can we compute the x,y point as destination of the Translate movement ? This is where we need to go back to our first grade math course – or – wikipedia 🙂 .
Any point on the circumference on a circle can be expressed with the following equation :
-
x = a + r cost t -
y = b + r sin t
where (x,y) is the destination point, (a,b) is the source point, r is the radius of the circle and t the angle to (x,y) (aka the direction where we want to go)
Should I translate these equations to our PieChart component :
-
(a,b) is the center of the component
-
r is 15% of the component’s radius
-
t is (end angle – start angle) / 2
All the values are known: x,y is easy to compute !
Apply the formula in JavaFX
Now than we know how to compute the destination point of an Arc, adding the Translate transformation is relatively easy.
Let’s first define a couple of constants
 def ANIMATION_DURATION = 0.5s;
  def ANIMATION_DISTANCE = 0.15;
The distance is expressed as a percentage of the component’s radius, while the duration is expressed in seconds.
Then, in the Arc component definition, add the onMouseEntered and onMouseExited method to apply the transformation.
def ARCS: Arc[] = bind for (angle in ANGLE_VALUES) {
   (...)
    var cos = Math.cos(Math.toRadians(0 - start - angle / 2));
    var sin = Math.sin(Math.toRadians(0 - start - angle / 2));
Arc {
   (...)    Code to define the Arc, see full code source in previous blog entry    (...)
     onMouseEntered: function(e: MouseEvent):Void {      //pie is moved to the outside of the circle      //cfr Circle equations
var transTransition = TranslateTransition {
duration: ANIMATION_DURATION node: ARCS[indexof angle] fromX: 0 fromY: 0 toX: (radius * ANIMATION_DISTANCE) * cos; toY: (radius * ANIMATION_DISTANCE) * sin; } transTransition.play(); }
onMouseExited: function(e: MouseEvent):Void {
//piece if moved back to center
var transTransition = TranslateTransition { duration: ANIMATION_DURATION node: ARCS[ indexof angle] toX: 0 toY: 0 fromX: (radius * ANIMATION_DISTANCE) * cos; fromY: (radius * ANIMATION_DISTANCE) * sin; } transTransition.play(); } } }
First, we compute the cos and sin values as they will be used in multiple places. We are using the java.lang.Math package for this. Note that these methods are expecting angles expressed in radians, not in degrees, hence the required conversion.
As their names implies, the onMouseEntered and onMouseExited function are called whenever the mouse enters or exists the Node where the functions are defined.
The code in these function creates a TranslateTransition object with the following properties:
-
duration: the duration to play the animation
-
node: the graphical component it applies to, in our case, the Arc we are currently building
-
fromX, fromY: the start of the transition (aka the center of the Pie Chart when the Arc is moving out)
-
toX, toY: the end coordinate of the transition, this is where we do apply our math formula : ( radius * percentage) multiplied by cos or sin, for x and y respectively.
The last line actually starts playing the transformation.
The onMouseExited method only differs by the fact we switched the from and to coordinates.
Add a small line between the pieces
I noticed that PieCharts are prettier when individual slices are separated by a couple of pixels instead of being sticked together (if you are not convinced, check the “before” and “after” screenshots above).
I first implemented this by drawing smaller Arcs, i.e. using a start angle + 1 and an end angle – 1. This technique gives indeed a small white line between the pieces, but the line is getting smaller and smaller towards the center of the Pie, as the center stays the same for all pieces.
To get the result I wanted, I shifted the whole piece away from the center by a couple of pixels. Each piece needs to be shifted away in different directions. Instead of giving x,y the coordinate of the center, I am using center + … and this is where our math basics are needed again.
We just need to apply the same equation to compute the x,y coordinate, slightly away from the center. I chose 1% of the original radius as a distance from the center.
//center is adjusted in the direction
//of the pie to create a gap between pieces
centerX: center + (radius * 0.01) * cos
centerY: center + (radius * 0.01) * sin
The Final Touch
Now that we added a 3D like effect and a movement in and out when the mouse is over a piece of the chart … let’s add our final touch.
We will add a gentle Glow effect on a piece when the mouse is over it.
We will add a couple of lines of code in the onMouseEntered and onMouseExited created previously.
 //very discrete glow effect
  ARCS[ indexof angle]. effect = Glow {    level: 0.1;  }
level is set to 0.1 when the mouse enters the piece and set to 0 when the mouse leaves the piece.
Full source code is provided as a NetBeans project or you can start the test application directly from this page by clicking on the image below.
Luxembourg Java User Group – Fun with Lego, Wii and Bluetooth
Posted by Sébastien Stormacq in Java on 20/02/2009
Last Tuesday, the Luxembourg Java User group (YaJuG) held its first 2009 meeting and the agenda was quite fun.
The slides (in french) are available and the full video of the sessions will be posted soon. A short, one minute, video overview of the evening is also published. |
 |
Create a reusable PieChart component with JavaFX – Part I
Posted by Sébastien Stormacq in Java on 15/02/2009
In my last blog entry, I described how to code asynchronous remote communications between a JavaFX application and a REST service.
I used, as sample JavaFX application, a pie chart component.
In this blog entry, I will explain how to build a PieChart, i.e. a reusable JavaFX class to be embedded in your own applications.
This blog entry will be in two parts :
-
Part 1 will describe the basic of creating a Pie Chart component (this blog entry)
-
Part 2 will describe how to make the component nice looking by adding behavior and 3D effects (to be published soon)
Before writing any piece of JavaFX code, you will need to download and install the JavaFX SDK, either standalone, either bundled with NetBeans IDE.
As a component user, I would like a reusable component with an easy to use API that let me specify the following :
-
the values to be part pf the pie chart
-
the center and size of the component
-
the colors to be used
These will be the public attributes that end users will be able to specify. Because I want the component to be easy to use, all these attributes (except the pie chart values) will have defaults, freeing component users to specify a value for each of these.
The first draft of the code will therefore look like this :
public class PieChartFX extends CustomNode {
public-init var colors = [ Color.rgb(83,130,161), Color.rgb(0,84,128), Color.rgb(248,152,29), Color.rgb(194,205,0), Color.rgb(255,199,38), Color.rgb(253,185,19)];
   public-init var radius: Integer = 100;
   public-init var center = 125;
   public var values = [ 0.0 ];
}
The values are expressed as an array of values.
center and radius are self explaining
The colors are expressed as an array of Color that will be used in a sequential order in the Pie.
The default values for the colors are the one from the Sun Color Palette, feel free to replace with whatever makes sense for you.
What makes a Pie ?
Technically, drawing a Pie is very easy. A Pie is a set of Arc components, all having the same center and where the sum of Arc’s angles is a full circle, i.e. 360 degrees.
There are two main steps in your Pie drawing code
-
Step 1 : convert the array of (arbitrary) values to an array of values where the sum is 360, each value being proportional to the original array value. For example, when the component user is giving us [25, 50, 25] it will be converted to [90, 180, 90]
This array will contain the angle values for each part of the Pie -
Step 2: draw an Arc component of the given angle (see Step 1), starting at the angle where the previous Arc finished. Our code will need to count the sum of angles we’ve drawn so far.
Actually, to make the drawing code easier, I chose to build two arrays : one to contain the angle values, the other to contain the start angle values.
Code goes like this :
//count the total values of the sequence var totalValue: Number = 0;
for (v in values) totalValue += v;
var sum = 0.0;
//create array of ANGLE_VALUES, sum is 360,
//pondered by percentage of each value
for (v in values) {
var percentage: Number = (v / totalValue);
   var newAngle = 360 * percentage;
insert newAngle into ANGLE_VALUES;
insert sum into START_VALUES;
sum += newAngle;
}
Having these two arrays will make the drawing code itself extra simple : just walk through each of these arrays and create an Arc with the corresponding start angle, angle value and color.
def ARCS : Arc[] = for (angle in ANGLE_VALUES ) {
var start = START_VALUES[ indexof angle];
   Arc {
centerX:  center
centerY:  center
radiusX:  radius
      radiusY:  radius
      startAngle: start
      length: angle
      type: ArcType. ROUND
      fill: colors[(indexof angle) mod colors.size()]
   }
}
The code above will create an array of Arc instances, in the order of the values computed in the ANGLE_VALUES array. The colors will be using in the corresponding order of the colors array, going back (mod) to the first one when all colors have been used.
Creating the component
Classes that extends CustomNode must overwrite the create() method to actually return something displayable in a Scene.
public override function create(): Node { return Group { content: bind ARCS; } }
In this code, we create a Group object made of our previously build array of Arc.
Redrawing when values changes
Wouldn’t it be cool to have our Pie Chart to redraw itself automatically when the user change the array of values, either replacing values, removing some or inserting new ones ?
JavaFX makes it very simple to code this type of behavior with two keywords : bind and on replace. Bind allows to link, at runtime, the value of a variable or attribute with the value of an expression. Each time the expression is changed, the value is recalculated and updated.
On replace behaves like a trigger in a RDBMS, it allows to execute code when the value of a variable or attribute is changing.
First, we want to recompute our angles when the values provided are changing.
public var values = [ 0.0 ] on replace oldValue[firstIdx .. lastIdx] = newValues { ... }
The code between { and } is the code listed above to compute ANGLE_VALUES and START_VALUES
Secondly, I want my ARC array to be changed each time new values are provided. This is where the bind keyword is used, just replace the ARC definition listed above with
def ARCS : Arc[] = bind for (angle in ANGLE_VALUES ) { ... }
Using the component
In your Main class, use the code below to actually create and display a PieChart
Stage {
title:  "Application title"
width: 250
height: 270
scene: Scene {
content: PieChartFX {
values: [ 110, 50, 80, 10, 30]
}
}
}
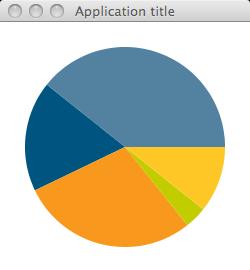
The end result is displayed below.
My next blog entry will improve this component : we will add some 3D look and we will add code to slightly move a piece out of the PieChart when the mouse is over it. Full source code will be provided.
Stay Tuned !
JavaFX asynchronous communication with JSON and REST based web services
Posted by Sébastien Stormacq in Java on 19/01/2009
While writing Rich Internet Application with JavaFX is relatively easy and well documented, fetching data from remote sources seemed more obscure to me. The documentation is minimal and I did not found any good tutorial describing the various techniques available to connect to a remote web service and how to parse the results.
While this blog entry do not aim at being such a tutorial, I will just give an example I developed over the week end to integrate a JSon based REST web service from a JavaFX application.
(For those of you interested in database access, my colleague Octavian just published a blog entry on the subject).
Let’s first start with the REST web service. Once you have installed the appropriate plugin into NetBeans, it is as simple as creating a web application, then creating a REST based web service.
I used the json.org supplied JSon Java classes to create the output message.
The web service I created just return 4 random values, between 0 and 100. The syntax of the returned message is
{“Values”: 21, 35, 76, 82}
And the code is as follow :
@Path("values")
public class ValuesResource {
Random rand = new Random(new java.util.Date().getTime());
@GET
@Produces("application/json")
public String getValues() {
String result;
try {
result = new JSONStringer()
.object()
.key("Values")
.array()
.value(rand.nextInt(100))
.value(rand.nextInt(100))
.value(rand.nextInt(100))
.value(rand.nextInt(100))
.endArray()
.endObject().toString();
}
      catch (JSONException e) {
e.printStackTrace();
result = "{ \"error\" : \"" +e.getLocalizedMessage() + "\" }";
}
      return result;
}
}
I deployed this on GlassFish v3 and tested from command line with curl :
marsu:~ sst$ curl http://localhost:8080/WebApplication1/resources/values
{"Values":[94,61,26,72]}
In my JavaFX application, I want to call this web service on a regular basis. I therefore choose to use the Timer and TimerTask Java classes to wrap the calling code and execute it on a regular time-based interval.
The first piece of code is a custom TimerTask. It wraps the JavaFX provided RemoteTextDocument, a very easy to use class that wraps the HTTP communication.
var values : Number[];
class Task extends TimerTask {
   override function run() {
      var request : RemoteTextDocument = RemoteTextDocument {
url: "http://localhost:8080/WebApplication1/resources/values";
}
      var returnValue: String = bind request.document on replace {
         if (request.done) {
            var data : JSONArray = new JSONObject(returnValue).getJSONArray("Values");
   for (i in [0..data.length() - 1]) {
   insert data.getDouble(i)into values;
}
}
}
}
};
The RemoteTextDocument as three useful attributes :
-
url, the URL to connect to ;
-
done, a flag indicating that the connection is completed ;
-
document, the text returned by the URL connection
The URL connection is made automatically when creating an instance of the class.
To get access to the document in an asynchronous way, I am using the bind and on replace capabilities provided by JavaFX.
My returnValue variable is bound to request.document, meaning that every time request.document is modified, returnValue is updated to reflect the new value.
The on replace trigger, allows to execute some code when the value of returnValue is changing, basically, it parses the resulting String with the Java based JSon classes and create an array of Number.
Easy to write, to read and very efficient !
The last step is to create a Java Timer to trigger the TimerTask on a regular basis. I want this process to start as soon as the JavaFX application starts. JavaFX does provide a run() function for this purpose.
function run( args : String[] ) {
def timer : Timer = new Timer("TimerThread");
def task  : Task = new Task();
   //run the TimerTask immediately and every 5 secs
timer.schedule(task, 0, 5000);
   //more JavaFX line of code, notably create the Stage and Scene etc ...
}
|
Et voila … the JavaFX application will start polling the REST web service every 5 secs. I further bounded the array of Number prepared by the TimerTask to a PieChart component. The net result is a self-refreshing pie chart as shown below. The PieChart JavaFX component will be described in a later blog entry. |
|
JavaFX for my kids
Posted by Sébastien Stormacq in Java on 03/01/2009
A year ago, I quickly developed a small application to learn my kid to use a keyboard and create words by typing letters. The application shows a word (usually the first name of a family member) and he must type the same word by clicking on the keyboard letters.
The application is providing sound-based feedbacks to pronounce the first name and each letter typed.
I used Java and Swing, the result is showed in the screen shot below.
Pretty simple but highly effective, my 4 years old boy loves to play this little game.
As you can see from the screenshot above, I am a software guy, not an graphical artist.
When JavaFX came in last December, I wanted to see how easy (or not) it would have been to re-write this application with a somewhat more appealing and modern graphical user interface.
The result is this new application, entirely similar in terms of functionalities but with a different look and feel.
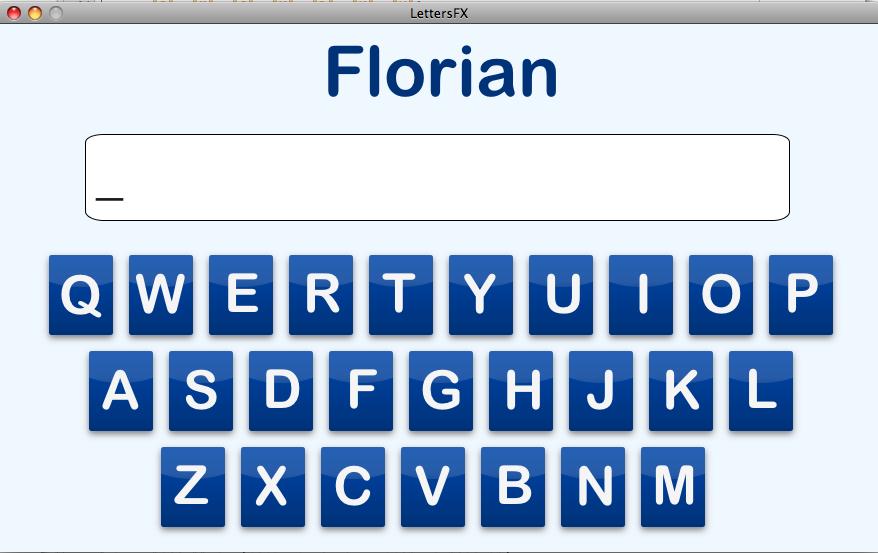
I also added some animations, the letter symbols zoom in and out when the mouse is over the letter and the box is highlighted when the user clicks on it.
There is more or less 500 lines of JavaFX code needed to write this application, roughly 20% less lines of code than the “equivalent” Swing application.
For the curious, you can download the source code.
Platform Popularity and Job Posting
Posted by Sébastien Stormacq in Java on 17/11/2008
One of the interesting way to mesure the popularity of a software platform or framework is to capture the number of job posting requiring experience with the platform or the framework.
This is the type of search indeed.com allows to conduct. And guess what ? GlassFish experience appearing in job postings increased ~700% during the last two quarters ! More than 6 times the growth of popularity of the other application servers.
Stil looking for evidences of GlassFish adoption ?