In my previous blog entry, I described how to build a reusable PieChart component with JavaFX.
In this blog entry, we will improve the component to make it visually more appealing :
-
we will add a small space between pieces of the pie
-
we will add a 3D like effect to the component
-
we will add behavior : when the user will move the mouse over one of the piece, it will slightly step outside the chart.
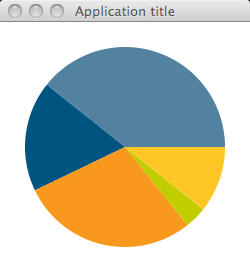
End result will be like this :
| Before: | After: |
 |
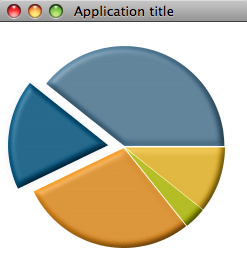 |
The 3D effect
Let’s start with the simplest modification, the 3D effect.
JavaFX does provide with many lightning effects that can be applied either to simple, individual component or to complete scene.
Many of these lightning effects create 3D like effects on the component they are applied.
To achieve the effect shown above, I just added a DistantLight effect to the component, as show below.
 public override function create(): Node {
     return Group {
        content: bind ARCS;
        effect: Lighting {
           light: DistantLight {
             azimuth: 225
              elevation: 60
           }
           surfaceScale: 3
        }
    }
 }
The three first line are taken from my previous code. It creates a subclass of Node, for which the content is an array of ARC. Please read the previous blog entry to have details about this.
I added to the group an effect attribute. This attribute contains a Lighting instance which, in turn, contains a DistantLight lighting effect.
This is as simple as this, it will create the lighting and shadow effects to create the illusion of a 3D component.
Back to your Math basics
The other changes will require some math first …
We want to move a piece of the chart outside the pie chart when the mouse is over it.
Moving an Arc is easy, JavaFX provides us with many transformations, including a simple TranslateTransformation that will move the Arc from a source coordinate (a,b) to a destination coordinate (x,y).
The source point is well known, it is the center of the PieChart component. How can we compute the destination point ?
The target point dependents on two factors : the direction where we will move the piece and the distance from the center where we want to stop.
For the direction, we will use the angle in the middle of the arc, i.e. (end angle – start angle) / 2
For the distance, we will use a percentage of the radius, 15% in this case (you might wonder how I found 15% … it was using trial and mistake approach, 15% seems to give the best result, feel free to use whatever other value you like)
So, how can we compute the x,y point as destination of the Translate movement ? This is where we need to go back to our first grade math course – or – wikipedia 🙂 .
Any point on the circumference on a circle can be expressed with the following equation :
-
x = a + r cost t -
y = b + r sin t
where (x,y) is the destination point, (a,b) is the source point, r is the radius of the circle and t the angle to (x,y) (aka the direction where we want to go)
Should I translate these equations to our PieChart component :
-
(a,b) is the center of the component
-
r is 15% of the component’s radius
-
t is (end angle – start angle) / 2
All the values are known: x,y is easy to compute !
Apply the formula in JavaFX
Now than we know how to compute the destination point of an Arc, adding the Translate transformation is relatively easy.
Let’s first define a couple of constants
 def ANIMATION_DURATION = 0.5s;
  def ANIMATION_DISTANCE = 0.15;
The distance is expressed as a percentage of the component’s radius, while the duration is expressed in seconds.
Then, in the Arc component definition, add the onMouseEntered and onMouseExited method to apply the transformation.
def ARCS: Arc[] = bind for (angle in ANGLE_VALUES) {
   (...)
    var cos = Math.cos(Math.toRadians(0 - start - angle / 2));
    var sin = Math.sin(Math.toRadians(0 - start - angle / 2));
Arc {
   (...)    Code to define the Arc, see full code source in previous blog entry    (...)
     onMouseEntered: function(e: MouseEvent):Void {      //pie is moved to the outside of the circle      //cfr Circle equations
var transTransition = TranslateTransition {
duration: ANIMATION_DURATION node: ARCS[indexof angle] fromX: 0 fromY: 0 toX: (radius * ANIMATION_DISTANCE) * cos; toY: (radius * ANIMATION_DISTANCE) * sin; } transTransition.play(); }
onMouseExited: function(e: MouseEvent):Void {
//piece if moved back to center
var transTransition = TranslateTransition { duration: ANIMATION_DURATION node: ARCS[ indexof angle] toX: 0 toY: 0 fromX: (radius * ANIMATION_DISTANCE) * cos; fromY: (radius * ANIMATION_DISTANCE) * sin; } transTransition.play(); } } }
First, we compute the cos and sin values as they will be used in multiple places. We are using the java.lang.Math package for this. Note that these methods are expecting angles expressed in radians, not in degrees, hence the required conversion.
As their names implies, the onMouseEntered and onMouseExited function are called whenever the mouse enters or exists the Node where the functions are defined.
The code in these function creates a TranslateTransition object with the following properties:
-
duration: the duration to play the animation
-
node: the graphical component it applies to, in our case, the Arc we are currently building
-
fromX, fromY: the start of the transition (aka the center of the Pie Chart when the Arc is moving out)
-
toX, toY: the end coordinate of the transition, this is where we do apply our math formula : ( radius * percentage) multiplied by cos or sin, for x and y respectively.
The last line actually starts playing the transformation.
The onMouseExited method only differs by the fact we switched the from and to coordinates.
Add a small line between the pieces
I noticed that PieCharts are prettier when individual slices are separated by a couple of pixels instead of being sticked together (if you are not convinced, check the “before” and “after” screenshots above).
I first implemented this by drawing smaller Arcs, i.e. using a start angle + 1 and an end angle – 1. This technique gives indeed a small white line between the pieces, but the line is getting smaller and smaller towards the center of the Pie, as the center stays the same for all pieces.
To get the result I wanted, I shifted the whole piece away from the center by a couple of pixels. Each piece needs to be shifted away in different directions. Instead of giving x,y the coordinate of the center, I am using center + … and this is where our math basics are needed again.
We just need to apply the same equation to compute the x,y coordinate, slightly away from the center. I chose 1% of the original radius as a distance from the center.
//center is adjusted in the direction
//of the pie to create a gap between pieces
centerX: center + (radius * 0.01) * cos
centerY: center + (radius * 0.01) * sin
The Final Touch
Now that we added a 3D like effect and a movement in and out when the mouse is over a piece of the chart … let’s add our final touch.
We will add a gentle Glow effect on a piece when the mouse is over it.
We will add a couple of lines of code in the onMouseEntered and onMouseExited created previously.
 //very discrete glow effect
  ARCS[ indexof angle]. effect = Glow {    level: 0.1;  }
level is set to 0.1 when the mouse enters the piece and set to 0 when the mouse leaves the piece.
Full source code is provided as a NetBeans project or you can start the test application directly from this page by clicking on the image below.
#1 by Fabien TODESCATO on 23/02/2009 - 10:39
As usual, nicely written, highly informative, and beautifully executed.
Thanks a lot.
#2 by Vaibhav Choudhary on 25/02/2009 - 17:59
Nicely written !
#3 by Sebastien Stormacq on 25/02/2009 - 23:43
Thanks !